My husband had a scholarship in Tokyo, Japan and studied there for 2 years. For our coming wedding anniversary later this year, he wants to tour me around Tokyo! In this blog entry, I shall talk about the documents that I prepared and how I applied for a single-entry Japan Visa.
This blog entry will only cover information about Japan visa application for people with Filipino nationality. I won’t be familiar about how foreigners in the Philippines may apply for it.
How early can you apply for a Japan visa?
You may apply for a Japan visa 3 months before your trip.
When can you re-apply for Japan visa if your application got rejected?
If a visa application is denied, applicant may only re-apply for the same purpose after (6) months.
Reason for the denial of visa will not be disclosed even if an inquiry is made.
How much is the Japan visa application fee?
1200 Philippine pesos.
Requirements to get Japan Visa for Philippines Passport in 2019
The following are needed to get a Japan visa as a tourist:
Philippine Passport
Visa Application Form
ID Picture
Birth Certificate
Marriage Certificate, if married
Schedule of Stay in Japan
Without Guarantor:
You also need the following if you are shouldering your own expenses during your trip to Japan:
Bank Certificate Validity of Bank Certificate is three (3) month from the date of issue
Applicant’s Income Tax Return (Form 2316) clear Photocopy (latest)
With Guarantor:
If you have a guarantor residing in the Philippines (another person who is paying for your expenses on your Japan trip) then he/she will have to provide the following too:
Guarantee Letter
Proof of relationship between applicant and guarantor (e.g. Birth Certificates etc.)
Bank Certificate (original) and Income Tax Return (ITR Form 2316) (clear Photocopy) of Guarantor
Other info on the requirements:
Document size for Japan visa application form should be A4
You are exempted from submitting birth certificate and marriage certificate if you can submit old/valid passports with used Japan visa.
Submission of any supporting documents not listed above is encouraged (e.g. applicant’s economic or social ties with the Philippines, urgent reasons for visit: medical certificate, wedding invitation).
Where to apply for Japan visa
It is required that we apply for Japan visa in accredited travel agencies. Several years ago I got my Japan visa from Reli Tours & Travel Agency in Mall of Asia.
This time, I applied at Friendship Tours and Resorts Corporation which is located at the 3rd floor of Dusit Thani, Makati. Other travel agencies accredited for Japan visa application in Dusit Thani are UHI, and Reli Tours & Travel Agency.
Documents that I submitted to apply for a Japan visa at Friendship Tours and Resorts Corporation
A 4.5×4.5cm ID Picture with white background (just tell the photographer it’s for Japan visa application and they should know how to set it up) — mine was taken 1 week before I submitted my application
I did not submit a Birth Certificate because I have an old passport with a used Japan visa
Guarantee Letter (I resigned from my office job and am still in the middle of setting up my own business, so I could not submit a Certificate of Employment or Income Tax Return. Even if I currently have income, I can’t submit any document to prove it. The solution was to make my husband my guarantor for the Japan tour.)
Proof of relationship between applicant and guarantor: this is also our Marriage Certificate
Original bank certificate of guarantor (His bank printed it in a Letter size paper instead of A4, but we had no problem — I was still issued a visa! I think only the application form is strictly required to be on A4 paper.)
Photocopy of guarantor’s Income Tax Return
Submission of documents to Friendship Tours and Resorts Corporation in Dusit Thani, Makati
We went to Friendship Tours and Resorts Corporation on a Saturday and arrived around 9AM. Their Saturday schedule is from 8:30AM to 12NN. The office was moderately crowded. We took a printed number for the queue at the Visa Application counters. It wasn’t a long wait since there were only about 2-3 persons ahead of us.
When it was my turn, the staff in the counter examined my documents. She stuck a label into the page of my old passport where there’s a used Japan visa, and then bound it with my valid passport using a rubber band.
This is what it looked like when they bound the 2 passports together — the pink label is where my used Japan visa is. (Photo taken on the day I got my passports back from the agency.)
The staff in the counter asked for my payment, which was 1200 pesos, and then gave me a receipt in return. She told me that it will be filed by Monday, and I there should be a result 1 business week after filing. The “1 business week” is probably the maximum time because many applicants get their Japan visa earlier than that.
Before I left, the staff also gave me a claim stub. Do not lose it!!
I walked out of the travel agency hoping that they grant me a visa. I think that the documents I submitted were all valid, and can’t think of anything that may cause the Japan Embassy to decline my visa application.
Japan visa was ready after 2 business days!
I submitted my Japan visa application on a Saturday, and then on Tuesday I already got a text from the travel agency that the result is ready. That’s 1 business day after the day of filing, or 2 business days after the day applied for a visa.
This was the content of the SMS:
This is an Auto-Generated SMS Doesn’t Support Replies/Calls
Good Day from FRIENDSHIP TOURS & RESORTS CORP. ! Please be informed that you may now claim the passport/s filed in our office for Japanese Visa, kindly present your receipt and/or valid ID to the RELEASING COUNTER.
FOR CLAIMING BY AUTHORIZED PERSON: Please BRING the following; 1) By1st Degree Family Member: (Parent,Spouse, Sibling,Child) **1Valid ID Original & 1Xerox of the Authorized Person 2) Relatives from 2nd degree, Acquaintance/Friend etc. Authorization letter with ORIGINAL specimen signature of passport holder. 1 Valid ID of Authorized Person (Original & Xerox) STRICTLY * RESULT/S will be given upon claiming of the passport/s. & NO LATE CLAIMANT/S
Schedule for Claiming: Mon.-Fri. 8:30AM-5:00PM Sat. 8:30AM-12:00NN For queries please dial; LAND LINE: 8109622/8938180 Thank you.
I couldn’t claim my passport because I got sick, so I asked my husband to claim it for me. He brought the original and photocopy of both of our valid IDs: his postal ID and my postal ID.
Embassy of Japan granted me a visa! Yay!
Even if I prepared my documents for the visa application meticulously, I was worried that my application might get rejected for whatever unknown reason. If it got rejected — what about the flight tickets and hotel booking that we already paid for? And places we planned to visit… 😱
Well, I got my Japan visa!
It looks a bit different from the Japan visa issued to me back in 2014.
Time to review some Japanese words and writings for our trip in a couple of months. <3
Rain… ☔🌧️ This is what we have now most of the time this month of August. A person who likes sunshine and beach such as me should be feeling down because of how the rainy season has come to end summertime, but not this year!
I already feel satisfied with the summertime, because me and my hubby (my adventure BFF!) just had our best summer so far:
We went to various Batangas beaches to swim and snorkel. This year I had the confidence to swim in deep water without fins and life vest, and gained a few new friends in these excursions.
I got licensed for Scuba diving and my hubby dived again after several years of not doing so.
We went to the lovely white sand beach of Boracay for the first time — I’d like to go back there again someday.
And finally, we finished a 2.5KM swim at theSwimjunkie Challenge VIP Lobo 2019 open water swim event! We are self-taught swimmers who were not physically active until recently, so this means a lot to us.
What is Swimjunkie Challenge ?
Swimjunkie Challenge is an open water swim race that is held at various destinations in the Philippines. The one we took part in was on June 9, 2019 in Malabrigo Beach, a pebble stone beach in Lobo, Batangas, but there are also other swim destinations such as El Nido and Caramoan. Even when it’s called a race, the hubby and I just swam hoping to finish. 😅
Me and my hubby are not triathletes, nor are we trained swimmers… so why did we join an open water swim challenge?
He says “gusto ko lang i-try” (I just want to try).
My reason for joining may be a bit corny. I learned how to swim front crawl (freestyle) last year in a pool that opened near home, and on our succeeding beach outings, I often swam that stroke in the sea and it really made me feel good, even when I only did it in shallow areas and short distance. I wanted to swim a distance in the sea because I could imagine how great that would make me feel, but being the scaredy cat that I am, I always hesitated to do so. I’ve always been fearful that there may be unknown creatures that may brush up against me. I hate crowds but I enjoy crowded beaches because it makes me feel safe. But the people in the crowd won’t swim with me to the distance that I want to cover, of course. A little dream began to form in me: To enjoy a distance swim in the ocean surrounded by many other swimmers to feel safe.
Being exposed to the online world, I eventually I stumbled upon the Swimjunkie Challenge open water swim race. Numerous swimmers would race against each other in the sea… that would be an amazing experience, I thought. Of course I don’t even think of actually racing, being the slowpoke that I am; I simply wanted to finish the distance! The VIP Lobo event’s shorter distance was only 2.5KM and I thought that maybe I can do it. At that time, the longest I was able to swim was only 1KM. When I told my husband about the event he immediately got interested and so we decided to really go for it. 😀
How I prepared for Swimjunkie Challenge open water swim:
Endurance / General Practice
We decided not to ask a swim coach for help yet because we wanted to test our “raw” skills first. People say that 2.5KM is for beginner open water swimmers anyway.
A couple of months before the Swimjunkie Challenge in Lobo, I began swimming in a 30-meter pool 2-3KM per swim session. I did that at least once a week.
One month before the event, we did our very first 2.5KM swim at Camayan Beach Resort. It was exhausting, and mentally challenging to me because I was frightened by the huge fishes that were leaping out of the water there, which may be mullet fish, or “banak” in Tagalog. When swimming against the current, unknown things brushed against my skin and I have this fear of the unknown that I had to fight back then.
And then one week before the actual event, we went to practice in All Hands Beach Resort in Subic. The photo above was taken while I was resting on a floatie. I was actually just recovered from viral exanthem then so I didn’t want to overexert my body. In that beach resort, aside from the fun inflatables, they have lane lines where triathletes usually train for swimming. There’s a very deep part in there where I did kind of lose my sh*t but that’s okay, because I read a lot of tips about open water swimming prior to that experience. If you begin to panic in fear of deep water, try to look at the sky as much as possible!
Navigation
Like the majority of open water swimmers, I do the front crawl (more popularly known as “freestyle”) stroke. When I breathe I get a glimpse of landmarks on my side, but what I need to see is what’s in front of me. From YouTube videos I learned about what we call “sighting”. During each of my swim training sessions, I practiced sighting by lifting up my head just enough for my eyes to be above water in time with the “pull” phase of my stroke, to see landmarks in front of me. Maybe I looked like an alligator/crocodile.
In Camayan Beach Resort, I was able to practice this well. I set a tall green “house” as my reference point on one side, and a “pole” on the other side — we swam back and forth within a 70-ish meter lane-lined area to complete 2.5KM, and I made sure that each time I did sighting, I was headed to the house or pole’s direction.
The pole that I was talking about
Fear of Deep Water
My Level 1 Training for deep water: Do it while enjoying the view of underwater life:
This was around Bauan Marine Sanctuary, near Bunker Dive Resort, during one of our summer outings with friends. This helped me build confidence in my buoyancy while swimming, that I will not sink in the water because my air-filled lungs act as a buoy.
My Level 2 Training for deep water: Do it in an environment similar to the actual event, where you’ll see nothing but BLUE in the water.
Before the actual Swimjunkie Challenge in Lobo, we practiced at All Hands Beach in Subic. We found out by doing online research that many triathletes train there.
At All Hands Beach Resort, there’s an area that seemed like the best spot to practice distance swimming. It is enclosed by lane lines, forming a square shape. If I remember correctly, each side of that square was around 300M, so we swam along the sides of the square 8-9 times.
Take note that the resort prohibits solo swimming within that square, probably because water in every corner of that square is deep and the feet won’t reach. When we get tired we hold on to the yellow floaters of the lane lines. There were spots inside that square where water was soooo deep that all I could see was blue. I started panicking when I realized how deep the water I was swimming in. And there were no other people there, just me and my hubby who is already so confident in the water and was swimming far away from me. 😱I was eventually able to control myself when I recalled what I read from an online article: When you begin panicking in the deep water, keep looking at the sky as much as you can, then you will start to calm down. Focus on your strokes and get moving, instead of thinking about what’s underneath! I did exactly that, and to my relief, I was able to calm down little by little. Each time I took a breath on my side during my front crawl / freestyle swim, I looked up at the sky. And each time I would lift my head up to sight ahead of me, I also looked at the sky to feel safe. I focused on my strokes, just wanting to move ahead and cover the required distance for my swim practice.
I didn’t get frightened of the deep water in the actual Swimjunkie Challenge VIP Lobo event because of the fear I conquered during training, and knew how to overcome the fear of deep water should it start to kick in. I’m also thankful for what Betsy Medalla (founder of Swimjunkie Challenge!) said during the race briefing: you only need to swim forward, not downward. 🙂 Simple words, but made perfect sense, right?
What it was like swimming 2.5KM in deep open water
Tow float
We bought tow floats for safety as we swim in deep open water. Swimmers may hold on to tow floats when they feel tired and need to catch their breath. It became a little bit annoying during my swim because my hands kept hitting it at the end of my stroke’s pull phase. Maybe I just need to figure out the best adjustment for it.
Sea urchins
At the starting point, I saw sea urchins where the water begins to get deep. Good thing the water is already deep there. Sea urchin stings are nasty so never touch or step on those!
Race start
We took it easy during race start, because we were really there just to have fun swimming. 😆We let most of the swimmers swim ahead of us. Then my goggles got flooded with water when I was already in a deep part. How lucky! I leaned on my tow float as I tried to fix my goggles. It wasn’t easy 🙁 but I got through that.
My hubby and I agreed that we wait for each other at each raft.
I looked at the water where we were about to swim. It seemed calm, but we were warned that current and swelling of the water will rise 1 hour after the start.
The rafts with marshals
This is one of the flagged rafts that served as reference points while we navigated during our swim
The rafts with colored flags served like checkpoints for swimmers to make sure they’re headed to the right direction. We memorized the colors of the flags in order, just to be sure we don’t do unnecessary detours during the swim.
Swimjunkie Challenge VIP Lobo: The raft at Turnaround Point with candy cane flag
I wouldn’t have made it if it wasn’t for the rafts where we could hold on to to catch our breath, and to take a sip of water. The Swimjunkie marshals on the rafts let us drink water from bottles. There were lots of water bottles used during the event, especially in the turnaround point, which I hope were all disposed properly. 🙂
The man who did breastroke all throughout his swim at Swimjunkie Challenge VIP Lobo 2019
My husband always swam ahead of me despite the fact that he did breastroke all throughout the swim event! It’s either because I’m too slow, or he’s too fast… but let’s just say he’s too fast! 🤣🤣🤣
Halfway from starting point to turnaround point
A huge percent of the areas where we swam at Malabrigo Beach was so DEEEEEEEEP that all I could see was blue… and jellyfish! 😱The deep water did not frighten me because I came prepared (more on this later) and the numerous swimmers and Swimjunkie marshals that were around made me feel safe. I was lucky because I had minimal jellyfish stings, just a few minor itch here and there.
At this point we saw that some swimmers were already making their way back from the turnaround point! We swam with many amazing swimmers — it was an honor. <3
Chafing from swimsuit
At one point, I thought I got stung by a jellyfish on the side of my neck. Turns out, the strap of my swimsuit began to cause chafing on my skin.
The Swimjunkie Challenge swim cap might be part of the challenge
The swim cap distributed among swimmers did not fit well in our heads… maybe the hubby and I just have large heads?! lol. We overheard a foreigner complain that the swim cap didn’t even fit. I turned to glance at him and saw that he had thick, curly hair. 😆There were times during the swim when the cap slipped off my head. I fixed it when I arrived at the next raft. A moment before the swim started, we saw one swimmer wearing a non-Swimjunkie swim cap. I thought we were all required to wear their cap. 🤔I wonder if she was exempted for some reason.
The solution to headaches and panic attacks during a long swim
When I was already swimming halfway from the turnaround point to the finish line, my head was already hurting. This usually happens when I get so worked up while swimming and “forget” to always exhale when my face is underwater. I tried to keep the headache from getting worse my attempting to always breathe out when my face is underwater. I think it’s pressure buildup in my head that is triggered when I’m not breathing in and out regularly.
There were also a few times when I had a panic attack. What helped was the same thing: keep breathing at all times. Breathe in when your mouth is in the air, and keep on breathing out while your face is underwater by doing slow controlled exhalation.
The current at Swimjunkie Challenge VIP Lobo 2019
The waves/swells in the actual event were bigger than the ones in this photo
The greatest challenge in the swim was the current! That feeling when you keep on swimming but don’t feel like you’re moving… 😅
The swim started around 6AM when the water was still calm, and around 7AM we were on our way back from the turnaround point — that was the time when the strong current kicked in.
I’ve heard from regular Swimjunkie Lobo swimmers that it’s the strongest current to date on a Swimjunkie Challenge VIP Lobo event. Wow… and we casual swimmers got through that? How can we be not proud of ourselves? 🥰
Just keep swimming forward despite the wave of anxiety
Race Finish
The finish line was already in my line of sight, and yet the current kept sweeping me away. Eventually I was able to reach it. YAY! 🎉
Ms. Betsy, the organizer, shook my hand to congratulate me. I think she shakes each and every swimmer’s hand when they finish. That’s a really nice gesture and makes me respect her even more.
Frog-faced me near the finish line.
Post-Race
We were awarded with a beautiful finisher’s medal.
They also gave us finisher’s shirts and we really like the design!
We also received free Arena swim caps, given in random colors. xD
Best-so-far summer experience
This is a video of me swimming during Swimjunkie Challenge in Lobo! I minded how my strokes looked like because I noticed that Mr. Robert Suntay was filming the swimmers who passed him. 🤭🤭
First session of diode laser at SkinStation Glorietta 5 for underarms
I just came home from SkinStation Glorietta 5 branch for my first session of Diode Laser for permanent reduction of underarm hair. Why am I doing this? Because I swim a lot and wish to spend less time worrying about my armpit hair! 🤣
TL;DR: Everything went smoothly and I liked the SkinStation staff, except that they are requiring clients to buy their Infladerm cream which is to be used for inflammation of the diode laser-treated areas. A friend and a blogger said that they were not required to purchase the Infladerm, but I purchased one anyway because it always feels like a drag to argue, and I was thinking maybe I should buy it anyway just in case my underarms do get irritated.
I was coming from MRT-3 Taft terminal around 9AM. The female section is often less crowded on weekday mornings when North-bound. My game plan was to go to Ayala station then pass through SM and Glorietta 4 to go to SkinStation at Glorietta 5, but I only remembered that malls usually open at 10AM! So, I exited through the Glorietta exit and walked through Courtyard Drive (along SM Makati) until I saw the Glorietta 5 building, which I jokingly call “Uniqlo Building” sometimes. The SkinStation at Glorietta 5 is at the 3rd floor. I arrived around 10AM. Mmmm the reception area smelled nice and that relaxed me a bit after the long walks. The receptionist was nice too. What I did before my laser diode session was hand over a printed copy of my voucher “Diode Laser for Underarms P5K for 8 sessions“, and also forward the email I received from SkinStation when I purchased that voucher (including the PayPal receipt which was included in that email).
The wait until my diode laser session wasn’t long. It actually started 10 minutes earlier than my appointment. Right before the diode laser session, I filled out some forms at SkinStation.
The laser technician lady seemed rude at first; I heard her ask the receptionist in a rough tone “Diode laser din ito?” while pointing at me. I just think that it’s kinda rude to refer to people as “ito” (“this” in English) and that “siya” (“him/her” in English) is better. LOL. But while doing the laser diode session, she seemed approachable and nice to talk to, so… no problem to me!
What it looks like in a room where SkinStation does their laser diode underarm hair removal.
Since my session was for underarms, I had to take off my shirt and don a lavender colored cover-up. The photo above is a bit blurry because I was in a hurry — the laser technician was already knocking on the door and I haven’t even taken my shirt off! HAHA.
I was wondering if the cover-up was fresh from laundry, or was it worn my someone else right before I used it.
First thing that was done was shaving of the armpit hair. I shaved them 1 week before my first laser diode, following the preparations for laser diode that SkinStation sent me.
After shaving the armpits, the laser technician at SkinStation put a cover on my eyes to protect them from laser.
And then, she applied gel on my left armpit and began rubbing the laser device on it. It felt warmer and warmer as time went by, but there was no pain. It was kinda relaxing. Then she applied a soothing cream, I think.
She did the same on the right armpit, but it felt much warmer than what I felt on the left. Also, about 1 second before she lifted up the device, I felt a very slight pain. It was very brief, and it’s the kind of pain when you pluck your armpit hair after a loooong time of not plucking it, or first time plucking it. I think it’s not a big deal.
After that, I took off the cover-up, wore my t-shirt, fixed my hair a bit, then headed out back into the reception area. I was required to purchase Infladerm for P220 pesos. Even though another blogger said she didn’t buy it and she was OK, I didn’t feel like arguing, and I thought I might need it if I’m unlucky and got irritated armpits later on, so I bought one anyway.
I’ll use it later after showing. No showering for 8 hours after the diode laser underarm session!
I am not allowed to swim for 1 week, according to the laser technician. Also, I’m not allowed to shave, pluck or wax because the hair might thicken again.
They also told me that the hair will grow right away (maybe tomorrow I’ll already see stubbles) but after 1 week I’ll notice that they will fall off on their own. That’s kinda exciting to see! XD
So yeah, I am satisfied with the laser diode for underarms service at SkinStation Glorietta 5. My next session should be within 6 to 8 weeks from today. So, within September 2 to September 16!
I hope this review of SkinStation’s laser diode for underarms helped you! I will try to update this post or post a new blog entry on my next laser sessions. 🙂
Update: 8 days after my first session for underarm diode laser, the hair can be pulled out without resistance. I also notice that the hair that I pull out don’t have the “root” attached, unlike when I plucked hair prior to laser treatment.
Second session of diode laser at SkinStation Glorietta 5 for underarms
On my second session at SkinStation Glorietta 5, I passed by the huge Uniqlo store as usual…
Sometimes I call Glorietta 5 the “Uniqlo Building” because the Uniqlo store seems to take up most of the space in the building. This photo was taken when I was already done with the SkinStation session.
My appointment for this session was at 11AM and I arrived just in time. The laser technician began my session about 10 minutes later. I really don’t like it when people are not mindful of exact time, but it was no big deal to me because I wasn’t in a hurry to leave and I had a good book with me.
The cover-up cloth looks messy because I was about to wear it and then I felt like taking a picture of the room first, so I placed it back on the bed like that 😂
A few minutes after I wore the cover-up and laid down, the laser technician entered the room. She commented that my underarm hair is thin for someone who’s only undergone 1 session before. I was also told that some clients purchase another 8-session promo package because 8 sessions are not enough to thin out or reduce their underarm hair. I guess I’m lucky? I hope I won’t need the yearly booster shots anymore for maintenance, so that I can avoid additional expenses. hehehe
First, she shaved my armpits — SkinStation advises that we don’t shave 2 weeks prior to the diode laser session so that the technician would see where hair growths are, and shall be targeted with laser.
Next, like before, she placed a paper napkin on my eye, followed by shaded eyeglasses. This is to protect the eyes from laser. I wonder if she also wore shades after that.
The gel that was applied to my kili-kilis was super cold this session! 😂 But there was totally no pain this time unlike the first session when I felt a very brief pain before the laser session finished.
I was able to make small talk with the laser technician today. I found out she performs laser on numerous amount of people each day, around 20 or more. That’s a lot, I thought. She said that the fact that the weight of the laser handle they use doesn’t make the job any easier. Performing laser diode on the legs is a bigger challenge because of the huge areas to be covered. But they are used to such difficult task since they work like that every single day, the laser technician said. The SkinStation branch is in Glorietta 5 so it is close to many offices, and in that area the malls get very crowded by 5PM onward. You can imagine how many office employees schedule their laser sessions in the evenings after work. Their appointment booking system also reveals how early they get fully booked. So far, it’s always fully booked at least 2 weeks ahead… and it kind of reminds me of DFA Passpoint Appointment. 😂Ubusan ng slots!
Like before, I was told not to wash the area for the next 6 hours. And yep, another week of no swim workout again for me. Time to drag myself to the gym! 😴
On my way home I took the MRT train. I sweat so easily, and after the walk from Glorietta 5 to MRT Ayala station, I was drenched in sweat. My armpits were marinating in sweat with my soaked t-shirt. 😂I know, I’m a yucky person. The problem was that I felt a subtle burning sensation during that time. Good thing my train stop was just 1 station away so I was able to change into sando at home within 30 minutes. I looked at my pits, and saw no redness or bumps, so no problem.
Update: after the second session, my underarm hair did not shed like in the first one! I was so worried to I asked SkinStation about it on Facebook Messenger. This was their response:
Shedding will depend on the reaction of your hair follicles to the treatment. Some experience shedding with just first few sessions while it takes a little longer for others. Around 10% – 15% should shed. That’s the hair population in its growth stage. You can also ask that the fluence (energy level) be increased in your next session. Just inform the aesthetician to increase the fluence of the diode laser to better target the smaller hair follicles.
So on my next session I should tell the laser technician (aesthetician) about the lack of hair shedding on my previous, and ask her to increase the energy level of the diode laser.
My third diode laser session will be in October! I’ll try to make kwento here again if I can. 🙂
Third diode laser underarm session at SkinStation Glorietta 5
From here on I will switch from calling the SkinStation staff “laser technician” to “aesthetician”. Sorry I’ve been using the wrong term. ^_^
On my third diode laser underarm session I told the aesthetician that shedding did not occur at all, after my second session. I told her that the instruction I received from SkinStation via Facebook Messenger is to ask for stronger fluence (energy level) of the laser. The aesthetician said that she can do that and I was glad to hear that.
This third session was my favorite so far, despite going in there still recovering from cough and cold, fearing that I might get cough attacks while the aesthetician was performing laser treatment on my armpits. lol. I often get sick and it’s frustrating. Anyway, it was enjoyable because today’s aesthetician gave me helpful pointers when it comes to shaving, and because I felt that the laser diode really worked this time.
Avoid shaving between diode laser underarm sessions
The SkinStation aesthetician told me that I should stop shaving! She disagreed about the advice I received from SkinStation’s Facebook Messenger that said “It’s okay to shave in between treatment sessions. But do not pluck live hair. Do not wax. And do not shave 2 weeks before your scheduled treatment. What is important is that hair can be seen by the therapist when it’s your schedule for treatment.” The aesthetician told me that shaving the hair in between sessions thicken the hair, making the diode laser sessions pointless. I told her that I swim often, and her advice is to simply trim the thickest hairs with a tiny scissors before swimming. According to her, she can’t explain WHY trimming does not thicken hair like shaving does, when both methods do exactly the same thing, which is to cut hair. But based on her experience, trimming the underarm hair is her proven way of avoiding thickened hair between diode laser sessions. And lastly, she told me that I can safely shave 5 days before my next diode laser underarm treatment, because we’ll destroy the hair follicles soon anyway.
On a side note, the aesthetician told me that waxing is not allowed before laser treatments because the laser may irritate and darken the waxed skin.
Higher fluence (energy level) and the sensations
Because today’s aesthetician used higher energy level on the diode laser used on me, I felt more “plucking” sensations and warmth from the laser equipment.
The plucking sensation was very slightly painful, almost like the pain you would feel when plucking hair for the first time.
The warmth of the laser equipment and the motions during treatment felt like I was being given an armpit massage. LOL. When it gets too warm, the aesthetician reapplies cold gel on the pits, then resumes the “armpit massage”. 🤣
Update: 7 days after the third diode laser session, my underarm hair began shedding. It worked again this time.
My next diode laser underarm session will be on November!
Fourth diode laser underarm session at SkinStation Glorietta 5
I felt anxious as I walked along the side of SM Makati and Glorietta today around 10:20AM because the malls seemed to be still closed when I’m used to going to Glorietta 5 SkinStation for my appointment around 10:30AM. I found out that the malls there open at 11AM when it’s Christmas season. Maybe that’s why the earliest slot at SkinStation today was 11AM! Anyway, I was lucky because Glorietta 5 was already open around 10:30AM and I was able to rest a bit inside the SkinStation lobby.
During the diode laser session, I asked the aesthetician to confirm if I may shave in between laser sessions, and she told me it’s not recommended because the hair will thicken. It’s a bit confusing because SkinStation leaflets and their staff who responds on Facebook Messenger say that it’s okay. Oh well, I’ll avoid it to be on the safe side.
This fourth session, the laser equipment just felt warm on my skin sans the prickly sensations. The aesthetician said that there are some clients who don’t or rarely shed after session, and that should be fine because they still notice the reduction of hair over time.
From now on, my sessions will be 8 weeks apart! I’ll need to set an appointment for January 21 or a few days later. 🙂
Fifth diode laser underarm session at SkinStation Glorietta 5
My armpit hair has grown so long. Looking at it, it’s as if the 4 laser sessions had not reduced the amount or thickness of hair.
I’m not gonna hold back — I’m not trying to scare you guys but the 5th diode laser session was painful! In my first four session, whenever I felt a prickly sensation (what they call “pumipitik”), it was only mild and only for very short periods of time during the session. This time, the sensation was stronger and it was felt throughout the laser session. I was worried that something might have gone wrong so I informed the aesthetician about the pain, and she told me it’s because she had to use high energy level because it’s already my fifth session, and that she will try to do it more gently to make it less painful. The device felt so hot on my skin. I tried to endure it to the very end. lol. I only hope that the pain is normal, and that the aesthetician was not making a mistake. 😬
I think I’ll have my sixth session after another 8 weeks.
Sixth diode laser underarm session at SkinStation Glorietta 5
Before I actually went to SkinStation for the 6th session, I was worried if my appointment was really set. Their booking system was down on the day when I was about to book for appointment so I simply texted them for it. A week before the appointment date I was trying to ask them if the appointment booking is confirmed, but they did not respond. Dunno why I didn’t think of checking my online account right away for any set appointment, but when I did, I saw the set appointment. What a relief.
Also, before leaving home for Glorietta, I checked my underarm hair. So far this is the time when I have the least hair in that area. I guess the diode laser has began to work.
One of SkinStation Glorietta’s laser machine was down on my 6th session, which is probably the reason why I waited over 10 minutes past my appointed time.
I’m glad that my 6th session wasn’t as painful as the 5th! I think the aesthetician’s chit-chat with me helped. Our conversation served as a distraction from the pain. I guess if you have low pain tolerance, try to hold a long conversation with your aesthetician to distract yourself. 😅
My next session, the 7th, will be after 8 weeks. I hope that I would be lucky enough not to need booster sessions after the 8th!
Update (2021-12-19): I didn’t push through with the 7th session because first, there’s still a pandemic, and second, I developed chronic urticaria / pressure urticaria (not caused by diode laser) and I’m scared that laser sessions may make it worse.
What other bloggers say about SkinStation Diode Laser for Underarms
Before my first diode laser session, the posts of other bloggers about their experiences helped me prepare, so now I send some love back through web links:
I remember having to work with someone before who often speaks vaguely, then gets mad when the person they are talking to doesn’t understand what they mean. Days when they threw a fit were very stressful days in my life.
The past few weeks I have been interacting with more people due to lifestyle changes. I noticed that I feel so upset when I fail to get my point across the person I’m talking to. Upon reflection, I think it may be because I need to improve the way I explain myself, and that I shouldn’t be upset at the other person, and instead try harder to communicate better with people.
I am glad that I got to know that person because this self-reflection on improving one’s communication skill became possible, and I got an idea of what kind of person I shouldn’t become.
I run a small baked-per-order goods business and many of my customers wanted to pay in GCash so granted them their wish to make payment more convenient. Prior to this, we used to accept bank transfer/deposit only, but when my husband showed me that he could cash-out money from his GCash account by sending it to his bank account, I knew we could make the business work with GCash because I’ll just transfer payments from the business’ GCash account to the business’ bank account. I created a GCash account and began accepting payments through it.
Then I found out that in order to send to banks, I need to get “verified”. And so I went through the full verification process: Uploaded a picture of my government-issued ID, a selfie, and my personal details. The GCash app said that it should only take 30 minutes to get verified.
For 30 minutes I waited, and received no SMS, email, or app notification from GCash. Ok, cool, maybe it’s just a bit delayed! I waited an hour more; still none. I waited one day, two days…. still no feedback on my GCash full verification status!
This is what my Get Verified screen looks like in the GCash app:
GCash app – upgrade in progress in Get Verified screen
You’ll see that it says “Upgrade in progress” in my GCash app’s Get Verified screen. That message just sits there 24/7 and never changes.
I tried to ask for help from GCash Care on Facebook Messenger, and all it does is make a chat bot get my hopes up that they will help me, but I never seem to be chatting with an actual customer service person.
We tried calling the GCash hotline 2882 but we couldn’t get any customer service staff to answer even when we waited for over 30 minutes.
The last thing I tried was write an email to [email protected] but same as GCash Care on Facebook Messenger, all the responses that I received were automatic responses.
GCash caused my stress level to soar up so bad, worrying that they might deduct money from my account due to inactivity and all our business’ earnings will be taken by GCash. Why do I worry about this? Because that periodic deduction is why I didn’t push through with using GCash before. I want to be able keep an account inactive for a long time without getting charged. I think the big problem is they don’t send out warning before charging! They send a notification AFTER CHARGING.
I wrote a rant post about this on my Facebook just to let off some steam, and a former colleague suggested that I just try to cash-out my money at Villarica Pawnshop. I will probably try that soon and hope it works, because I don’t wanna lose our money. It’s just extremely disappointing. I decided that we let our business’ customers pay via GCash because I thought I will be able to transfer money directly from GCash to the business’ bank account, but it’s not happening because no one at GCash can help me out with the full verification of my account.
Occasionally, I do kikay stuff too! Swimming is something I got into recently, and frequently being in swimsuit, swimming the front crawl stroke which often exposes the armpits, prompts me to keep the underarms hair-free… as much as possible. 😆 For a few months I turned to waxing at Lay-Bare but talking to girl friends made me learn about “laser diode” treatment to permanently reduce (not eliminate) hair. Several months ago I bought a promo package “Diode Laser for Underarms P5K for 8 sessions” from them, hoping for less hassle maintenance of underarm hair.
Today I finally booked for my first appointment. One can do so by visiting their website and selecting “Book” on the desired services. There are no longer available slots 1 week from today. I booked mine for next next week at the SkinStation Glorietta 5 branch. Good luck to me finding where that is; I get lost easily! 😀
So, I always want to come prepared. In Lay-Bare, they advise against waxing for ladies when they have their periods. So I asked SkinStation on Facebook Messenger if having menstruation during laser diode for underarms is fine, and this was their response:
Question: Is it fine to undergo a Diode Laster for Underarms session when I have menstruation?
Answer from SkinStation: Yes it’s okay, as long as the treatment is not for Diode Laser Brazilian or Bikini Line. It’s not contraindicated however it depends on your skin condition. You might get contusions or “pasa pasa” if your skin is sensitive. If you feel discomfort, you can have the treatment done after your period.
Then I ask how I should prepare for my appointment:
Question: Is there anything I need to avoid before the Diode Laster for Underarms session?
Answer from SkinStation:
Here are the guidelines before and after Diode Laser treatment.
Pre (Before):
• Do not shave area to be treated 2 weeks or at least three (3) to five (5) days before your appointment.
• Do not pluck, wax or use a depilatory in the areas you wish to treat four (4) weeks prior to your treatment.
• Avoid any unnecessary UV exposure to the areas to be treated four (4) weeks prior to treatment.
• Avoid self-tanning products four (4) weeks prior to treatment.
• Do not apply Retinol/ Retinoic acid-containing creams/lotions one (1) week before your Diode laser treatment.
• Stop application of NanoWhite Intensive underarm cream one (1) week before your Diode laser treatment.
• No peeling agents or diamond peel one (1) week before the procedure
Post (After):
• Some redness in the treated area may occur after your treatment. Apply post laser or Infladerm. If the redness does not subside in a few hours, please call the clinic at once.
• Do not wash the treated area for six (6) to eight (8) hours.
• Avoid applying exfoliants (glycolics, retinoids, etc.) to the treated area for seven (7) days.
• Keep area clean and wash gently. Do not use hot water. Do not use sauna.
• Apply sunscreen of SPF 30 or higher to exposed treated area for at least six (6) weeks.
• Do not use deodorant or antiperspirant for 12 hours after your Diode treatment.
• Do not apply Retinol/ Retinoic acid-containing creams/lotions for one (1) week after your Diode laser treatment.
• Stop application of NanoWhite Intensive underarm cream one (1) week after your Diode laser treatment.
• Expect hair to grow immediately after the treatment. This is normal. After two (2) weeks, 10% to 15% of the hair will have no resistance. Do not pluck or wax the hair which still has resistance.
One afternoon, I was playing an “action” game on my Samsung Galaxy S8 when the phone suddenly froze — no button responded to my presses, whether it’s a soft button or hard button, with the motionless screen of my game still on display. After a few seconds, the phone turned off. I noticed that my phone was very HOT! I thought maybe I zeroed out its battery so I tried charging it… nope, it wasn’t charging. I thought maybe the battery is really exhausted and that after 5-10 minutes there would be an indicator of it charging, but nope. I kept on trying to charge it but no luck so I called it a night and left the Samsung Galaxy S8 to rest in my drawer, while switching to my extra phone — an LG G3 which still works fine but is very slow and the camera can’t compare to that of Samsung Galaxy S8. Still, I’m glad I kept it.
The next day I tried plugging it in and it finally began charging again! The LED light was on and it had a charging indicator.
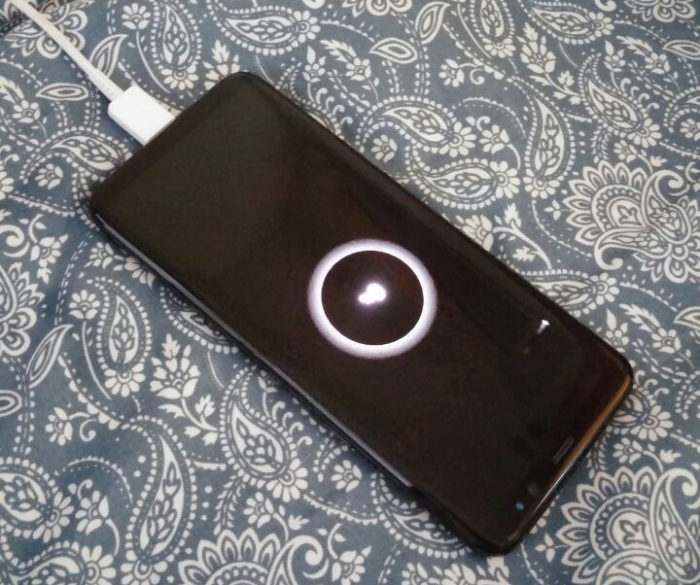
Later, I turned it on. It prompted me for my lock pattern so I thought I was gonna be able to use my phone again. But each time I enter the correct pattern, the Samsung Galaxy S8 would restart and prompt me for the pattern again. It went on like that so many times.
Fix attempt #1: Clear Cache
Wipe cache partition
Turn off the device.
Press and hold the Volume Up key and the Bixby key, then press and hold the Power key.
When the Android logo displays, release all keys (‘Installing system update’ will show for about 30 – 60 seconds before showing the Android system recovery menu options).
Press the Volume down key several times to highlight “wipe cache partition.”
Press the Power key to select.
Press the Volume down key to highlight “yes” and press the Power key to select.
When the wipe cache partition is complete, “Reboot system now” is highlighted.
Press the Power key to restart the device.
Source: Wipe cache partition: Samsung Galaxy S8
First thing I tried to do was to clear the phone’s cache via Recovery Mode. Then I chose “Reboot”.
After rebooting, my phone automatically entered Recovery Mode again. I thought “ugh it must have not worked because this feels like a loop again”.
Fix attempt #1: Clear Cache
Turn off your Galaxy S8 (if it’s not already).
Hold down the Volume up, Bixby, Power buttons simultaneously until the Samsung logo shows up on the screen. Lift fingers.
You’ll see an Android figure with the words No command on screen. Wait a few seconds.
Once the black background with colored text appears, use the volume down button to scroll to Wipe data/factory reset.
Use the power button to select Wipe data/factory reset.
Use the volume down button to scroll to Yes.
Use the power button to select Yes.
Source: How to reset the Galaxy S8 to factory settings
Desperate, I did a data wipeout. As I thought, I was in another boot loop. Each time I reboot from Recovery Mode, my phone just automatically re-enters Recovery Mode again.
Rebooting my Samsung Galaxy S8 from Recovery Mode triggers the loop, but “Power Off” works as long as the phone is not plugged to a charger. I also noticed that while the Samsung Galaxy S8 was powered off, when I plug it to a charger, it automatically turns on. I have no idea why that happened.
Anyway, that was the time when I knew I had to take my Samsung Galaxy S8 to the service center. I was ready to try flashing the “bricked” Samsung Galaxy S8 but I wasn’t able to obtain a copy of the firmware, so yeah, I had no choice but to as professional help.
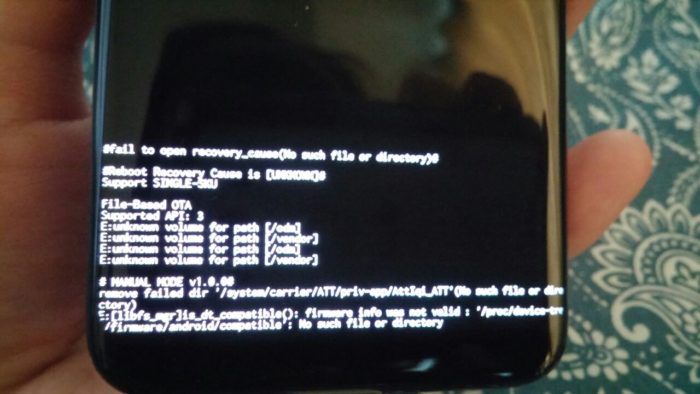
By the way, te Recovery Mode screen showed error messages at bottom, like so:
Mall repairman
First I went to a guy in a nearby mall who does phone and laptop repairs instead of a Samsung Service Center; my Samsung Galaxy S8’s warranty had already expired anyway. The repairman refused to work on it. He said that if he fails to fix it by flashing the firmware, I’ll have to bring it to the Samsung Service Center, who in turn might refuse to service it because a third party already attempted to flash it. Well, thanks to him for being considerate instead of attempting to fix it and charge us for it.
Samsung Service Center
Come weekend, me and my hubby went to SM Megamall to watch Spider-Man: Far From Home with friends (nice movie, by the way, except the villain reveal part). But before and after the movie we had gone back and forth the Samsung Service Center in there. I think it’s also called the “Samsung Flagship Store SM Megamall”.
In the Samsung Service Center there is a kiosk that prints a queue number, which could be for Inquiry, Repair, Claim, and another item whose name I forgot because I never used it on my visit. xD
We had a “Repair” queue number and during our turn, the staff assigned to us said that they will attempt to flash the firmware. If that worked they would charge me P700, otherwise they won’t but will advise motherboard replacement to fix my sick baby Samsung Galaxy S8 which will cost me P12,000. OH NOOOOO… I was still hopeful that a flash was all it needed. On a side note, I liked that all the staff we encountered there at the Samsung Service Center were easy to talk to and not intimidating in any way.
After 1 hour we returned (got a “Claim” type of queue number) and were told that the firmware flash did not work and the motherboard had to be replaced.
Buying a new phone is the common decision of users when the phone needs repair that costs over P10,000. But for important reasons, I had to stick with my Samsung Galaxy S8 and had no choice but to have the motherboard replaced. What important reasons? I did not NEED an S9 or S10. I was still happy with my S8, if only it hadn’t become a pretty little BRICK. For a moment I had considered buying a new Samsung phone that costs around P15,000 but we found out that it’s NOT WATERPROOF and that nowadays, only flagship phones are released as waterproof by Samsung. The hubby advised that if I wanted a phone whose specs and camera are at par with the Samsung flagship phones, I should buy Huawei or Xiaomi phone… but buying a phone from these companies is not an option because as much as possible I wish to NOT support Chinese brands. And… err, I am just really attached to Samsung phones! 😊 That left me with fewer choices, which are: buy an S9, buy an S10, or revive my Samsung Galaxy S8. I chose the last option because it’s still waaaaay cheaper than buying S9 or S10 which I don’t really want anyway! After all, there’s something I’ve been saving up for. Nah, I ain’t telling you what. 🤣
With that decision we took another queue number for “Repair”. I felt the energy leave my body when the staff told me the total cost would be P15,300. The additional costs came from the “tape” to be used to retain waterproofing on my beloved waterproof phone, and the service charge. I stuck with my decision and pushed through with the motherboard replacement. When I met up with our friends again I was totally in a bad mood but I tried my best to act normal; I hope they didn’t mind my slight grumpiness.
The staff told me they’ll call when the phone repair is done and ready for pickup, or when something aside from motherboard replacement need be done to make the Galaxy S8 work again. After watching Spider-Man: Far From Home, they hadn’t called yet. I realized I didn’t ask if it should be done on the same day. 😅 We went back to the Samsung Service Center to ask what time was the expected repair completion. It was around 4:30PM then. The staff said we can come back to claim my phone by 7PM. W00t!
Me, the hubby, and our friends first went to Ramen Nagi for early dinner in The Podium… only to find out that the Ramen Nagi we were expecting is now just an “under construction” wall. 🤣🤣🤣 But my friends’ craving for that bagoong flavored ramen at Ramen Nagi was strong enough to make us walk to Robinsons Galleria! Another side note: I usually have adventurous taste buds but at Ramen Nagi, I was the only one in our table who disliked the bagoong ramen and the basil & cheese ramen! Ugh. Sorry, Ramen Nagi. I really loved the basic “butao” ramen tho.
At 7PM our pals said goodbye, while me and the hubby walked back to SM Megamall to get my phone. We like walking, yeah.
For the last time we took a queue number at the Samsung Service Center, a “claim” number. The staff powered my Samsung Galaxy S8 on, and my eyes lit up when I finally saw my phone boot up the Android OS again 😂She demonstrated various functionalities of the newly revived phone such as color display, screen rotation, sounds, among others, to show that it’s working. I paid for the repair right there, with the staff who handed the phone over to me. Thanks for accepting debit cards! Otherwise I would have had to run to find an ATM machine outside and then run back to the service center again.
Why does this happen?
The Samsung Service Center staff could not give us a satisfactory answer, but it’s not a big deal to me because I understand how we can’t provide accurate reasons for failure of software/hardware some times. If they were running a profiler on my phone while I was playing that “action” game (I’m not saying what game because I suck at it even though I LOVE playing it) before it broke, then they should be able to pinpoint what went wrong, but no. In case you’re curious about what the staff said, she said that it’s possibly because I downloaded an update for my system, which didn’t finish. But I didn’t do any system update before that game session so it doesn’t make sense to me. 🤔
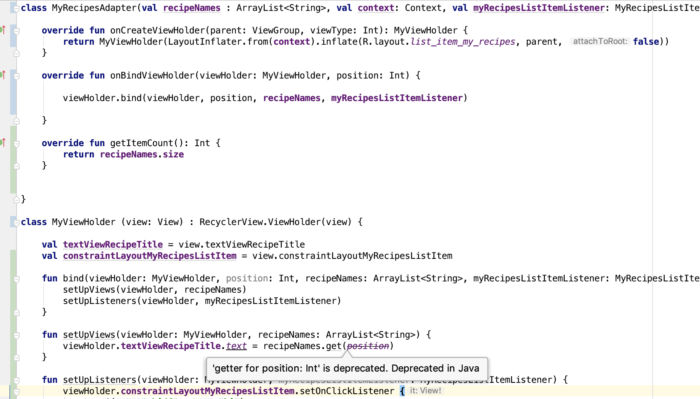
Today I encountered a deprecation warning as I’m coding the app: 'getter for position int' is deprecated. deprecated in java
And I was like, whoa, this wasn’t deprecated a couple of months back when I last touched Android code… this is how long I’ve missed out! 😂😂😂 I haven’t touched any app code for a while, until this week. I am easing back into Android app development, and this time it’s for my personal use but hoping to share on Google Play Store for free… just in case it may help others.
The following RecyclerView Adapter code needs polishing 😂, but for the sake of showing you the deprecation warning, here’s a screenshot:
The deprecation warning is inside the ViewHolder class inside my RecyclerView Adapter file. By the way, I code in Kotlin now for Android apps.
I worked with a developer before who liked suppressing deprecation errors like this, but I advised him that it’s better to address the issue than suppress it because it will haunt him in the future! 🤣 I still believe in that up to now, so I searched for a solution.
This is the problematic line, and ‘position’ is the problematic variable:
The solution? Simply replace position with adapterPosition.
And why is it deprecated? I found a note in RecyclerView.java:
* @deprecated This method is deprecated because its meaning is ambiguous due to the async
* handling of adapter updates. You should use {@link #getLayoutPosition()} or
* {@link #getAdapterPosition()} depending on your use case.
That’s all I have to say about the ‘getter for position int’ is deprecated. deprecated in java warning. Happy coding, you all.
I just began learning Kotlin for work and one of the first errors I encountered is “overrides nothing” pointing at the overrides of the function instantiateItem() for my PagerAdapter
The function/method signature was like this:
override fun instantiateItem(parent: ViewGroup?, position: Int): Any {
To fix the error, I simply removed the question mark from the arguments so that it looked like:
override fun instantiateItem(parent: ViewGroup, position: Int): Any {
Voila! Error gone and the swipe view that needed the PagerAdapter worked.