Category: Coding

  • How to Serve an Astro Site from Subpath like /resume (Markdown Resume Example)

    Recently, I’ve been blessed with time to play around with things I missed in the world of web development while I’ve been heads-down in Android apps. Astro is one of the things I got curious about recently, and my curious mind led me to try making it display a page derived from the contents of a Markdown file containing my resume. Why a resume.md file? Simply because it’s what I happened to have, ready to use at that moment.

    So, how do we serve an Astro Site from Subpath like /resume?

    Quick answer for TL;DR peeps :-p

    Tested: November 8, 2026 on macOS with Node.js v26.13.0 and Astro v7.4.7:

    To build a resume website with Astro, install Node.js, create a project with npm create astro@latest resume-site (minimal template), save your Markdown resume as src/data/resume.md, set base: '/resume' in astro.config.mjs, render the resume in src/pages/index.astro, preview it with npm run dev, and generate the static files with npm run build. The result is a single-page static site served from the /resume path (locally at http://localhost:4321/resume/) that displays your Markdown resume.

    To dive into more details beyond the above summary, such as screenshots from my terminal, copy-pasted code from files I edited, a troubleshooting “cheatsheet” table, and an FAQ.

    Everything below was run on a Mac, and the exact versions are listed in the “Tested with” table for our reference. Yes, “our reference” — I write these how-to articles mainly for myself because I tend to easily forget things. (That girl could never remember if a friend resides in Pampanga or in Pangasinan? I’d rather not name that girl, but let’s call her Catzie.)

    Okay, back to serious business!

    Every command relevant to this article, in one place:

    node -v
    cd Documents
    mkdir webproj
    cd webproj
    npm create astro@latest resume-site
    cd resume-site
    mkdir src/data
    mv /path/to/myresume.md src/data/resume.md
    vim astro.config.mjs        # set base: '/resume'
    vim src/pages/index.astro   # render the resume
    npm run dev                 # preview at http://localhost:4321/resume/
    npm run build               # static files are written to dist

    Any text editor works in place of vim. It’s just been a long-time habit of mine to use vim when I edit text files quickly through command line interface. The exact contents of the two edited files are in steps 2.2 and 2.3 below.

    In this article

    1. Prep your tools (install Node.js)
    2. Make the project (create the Astro site)
      1. Add your resume file to src/data
      2. Set the base path in astro.config.mjs
      3. Create index.astro to render your resume
      4. Test locally with npm run dev
      5. Build the real files with npm run build
    3. Troubleshooting
    4. Summary
    5. Key terms
    6. Frequently asked questions
    7. Sources and further reading

    Key takeaways

    • Install Node.js first. node -v returns a version number once it is installed, and the macOS installer also installs npm.
    • npm create astro@latest resume-site scaffolds the project. This walkthrough chooses the minimal (empty) template, installs dependencies, and initializes a git repository.
    • Setting base: '/resume' in astro.config.mjs makes the site work at /resume instead of the main site address.
    • The Markdown resume lives in src/data as resume.md and is rendered by src/pages/index.astro through the Content component.
    • npm run dev previews the site at http://localhost:4321/resume/, and npm run build writes the static production files to dist.

    Tested with

    ComponentVersion or detail
    Node.jsv26.13.0 (64-bit macOS installer from the LTS page)
    npmv11.20.0
    create-astro5.3.1
    Astrov7.4.7 (shown in the dev server output)
    Starter templateMinimal (empty)
    Operating systemmacOS
    Date testedNovember 8, 2026
    Versions and environment used in this walkthrough, taken from the terminal output and screenshots below.

    Prerequisites

    • A Mac with a terminal. This walkthrough uses macOS, and paths such as /usr/local/bin come from the macOS installer.
    • Node.js, which you can get from the Node.js download page. Astro’s dev environment setup guide currently lists v22.12.0 as the minimum supported version and says odd-numbered versions are not supported (checked November 2026). This article uses v26.13.0.
    • A resume written in Markdown (a .md file).
    • A text editor. This article edits files with vim in the terminal, and includes the few vim keys you need.

    Part 1: Prep your tools (install Node.js)

    This part checks whether Node.js is already installed and, if it is not, installs it on macOS. Node.js and npm are needed for every Astro command used later.

    I ran node -v in my terminal and it returned “not found”, so I installed Node.js on my Mac with the details below.

    I downloaded the 64-bit installer from the LTS page (at the time it was https://nodejs.org/en/blog/release/v26.13.0).

    The 64-bit installer package installed the following:

    • Node.js v26.13.0 to /usr/local/bin/node
    • npm v11.20.0 to /usr/local/bin/npm

    My Mac then asked whether I wanted to move the “node js” installer to the trash, and I said yes!

    I closed and reopened the terminal, and node -v now returns v26.13.0. Sweet.

    Part 2: Make the project (create the Astro site)

    This part scaffolds a new Astro project named resume-site with the create-astro command and the minimal (empty) template, then adds the resume file, sets the base path, creates the index page, tests locally, and builds the static files.

    Create a webproj folder in Documents and move into it:

    cd Documents
    mkdir webproj
    cd webproj

    Create the Astro project with the create-astro command:

    npm create astro@latest resume-site

    npx asks to install [email protected], and I answered y:

    Need to install the following packages:
    [email protected]
    Ok to proceed? (y) y
    
    > npx
    > 'create-astro' resume-site
    Terminal showing the create-astro prompt asking how to start a new project, with starter template options
    Figure 1: The create-astro prompt asking how to start a new project, with the starter template options listed.

    Answer the questions that create-astro asks. Use the arrow keys to choose an option, then press Enter.

    My answers:

    tmpl   How would you like to start your new project?
           Use minimal (empty) template
    
    deps   Install dependencies?
           Yes
    
    git    Initialize a new git repository?
           Yes

    Done for now. Here is the finished setup:

    Terminal showing the finished Astro project setup: minimal template, dependencies installed, git initialized
    Figure 2: Final create-astro output for resume-site, showing the minimal template, installed dependencies, and an initialized git repository.

    Omg, it created the initial commit for me. Saved mental resources, such as what to write as the commit message:

    git log
    commit 30521bd903ee79f2b87b4df4cb07a8a0cd417832 (HEAD -> main)
    Author: houston[bot] <[email protected]>
    Date:   Sun Nov 8 17:21:25 2026 +0800
    
        "Initial commit from Astro"

    Move into the new project folder. Every remaining command in this guide runs from here:

    cd resume-site

    2.1 Add your resume file to src/data

    Create a src/data folder inside the project and move your Markdown resume into it as resume.md so the index page can import it.

    Create the data folder inside src:

    mkdir src/data

    Move your resume file into [...]/webproj/resume-site/src/data. Rename it to resume.md while moving it, because index.astro imports ../data/resume.md:

    mv /path/to/myresume.md src/data/resume.md

    2.2 Set the base path in astro.config.mjs

    Replace the contents of astro.config.mjs with a configuration that sets Astro’s base option to /resume, so the site is served from the /resume path.

    Open the Astro config file in vim:

    vim astro.config.mjs

    New to vim? You only need these keys. Type gg then dG to delete everything in the file. Press i to start typing, paste the code, press Esc, then type :wq and press Enter to save and quit. Any other editor works too.

    Delete everything in the file. Paste this:

    import { defineConfig } from 'astro/config';
    
    export default defineConfig({
      base: '/resume',
    });

    Save the file.

    This is the most important step. It makes the page work at /resume instead of the main site address.

    vim editing astro.config.mjs with base set to '/resume'
    Figure 3: astro.config.mjs open in vim with base set to ‘/resume’.

    2.3 Create index.astro to render your resume

    Replace the contents of src/pages/index.astro with a page that imports Content from the Markdown file and renders it.

    Open index.astro in vim from the project folder:

    vim src/pages/index.astro

    Delete everything in it (same vim keys as above). Paste this:

    ---
    import { Content } from '../data/resume.md';
    ---
    
    <html lang="en">
      <head>
        <meta charset="utf-8" />
        <meta name="viewport" content="width=device-width, initial-scale=1" />
        <title>Art Resume</title>
      </head>
      <body>
        <main>
          <Content />
        </main>
      </body>
    </html>
    
    <style is:global>
      body {
        max-width: 42rem;
        margin: 2rem auto;
        padding: 0 1rem;
        font-family: system-ui, sans-serif;
        line-height: 1.7;
        font-size: 1.1rem;
      }
    </style>

    What this does: the block between the --- lines imports Content from your Markdown file, <Content /> renders that file as HTML inside <main>, and the <style> block centers the text in a readable 42rem column. Change the <title> to whatever you want shown in the browser tab.

    Save the file. Your project now contains these files (other generated files omitted):

    resume-site/
    ├── astro.config.mjs
    ├── package.json
    └── src/
        ├── data/
        │   └── resume.md
        └── pages/
            └── index.astro

    2.4 Test locally with npm run dev

    Start the Astro dev server with npm run dev and open the /resume path on localhost port 4321 to preview the page.

    Run npm run dev inside the resume-site folder:

    npm run dev
    Terminal showing the Astro dev server ready at http://localhost:4321/resume
    Figure 4: The Astro dev server ready at http://localhost:4321/resume after running npm run dev.

    It runs and displays the Markdown content as expected on http://localhost:4321/resume/. Because base is set to /resume, open that path rather than the plain http://localhost:4321/ address.

    Press Ctrl+C in the terminal to stop the server.

    2.5 Build the real files with npm run build

    Run npm run build to generate the static production files, which Astro writes to the dist folder.

    Run the build command:

    npm run build

    Built! Here is the build output:

    Terminal showing astro build finishing with Complete!
    Figure 5: Output of npm run build, ending with Complete! after Astro generates the static route.

    Because base is /resume, the files in dist should be served from the /resume path on your site.

    Troubleshooting

    These are the problems most likely to come up in the steps above, based on how each step works.

    SymptomLikely causeFix
    node -v says “not found”Node.js is not installed, or the terminal was opened before the install finished.Install Node.js from the download page, close and reopen the terminal, then run node -v again.
    Astro commands fail on an old Node.jsYour Node.js is older than Astro’s minimum, or is an odd-numbered version.Run node -v and compare it with the minimum listed in Astro’s setup guide (v22.12.0 when checked in November 2026).
    http://localhost:4321/ does not show your resumebase is set to /resume, so the page lives under that path.Open http://localhost:4321/resume/ instead.
    An error about ../data/resume.md not being foundThe resume file is missing from src/data or has a different name.Make sure the file is exactly src/data/resume.md, or change the import path in index.astro to match your file name.
    Common problems in this setup and how to fix them.

    Summary

    You now have an Astro project named resume-site that renders a Markdown resume at /resume. It was previewed locally at http://localhost:4321/resume/ and compiled to static files with npm run build. Because base is set to /resume, the page is served at the /resume path instead of the main site address.

    Catzie’s Qualms re using Astro specifically for a one-page resume site

    The site I created was just a resume with 1 page. When it was time to add Google Analytics tracking code, it didn’t feel right to open the .astro file again and rebuild just to copy-paste again to my web hosted file. I think if I want to keep Astro as that resume site’s framework, I’d setup a form of CI/CD. Otherwise, I’ll keep it simple with good ol’ HTML + CSS and a dash of JavaScript as needed. At this point, I am not really very familiar with coding in node.js yet! I simply followed other guides to do what I did here. Maybe that’s one thing I’ll try in the near future. 🙏

    Key terms

    Astro
    A web framework for building content-driven websites. This article uses it with the minimal template to generate a static page from a Markdown file.
    Node.js
    A JavaScript runtime. Astro’s command-line tools run on it, so it must be installed first.
    npm
    The package manager installed alongside Node.js. It runs the create, dev, and build commands in this article.
    Base path
    The URL subpath a site is served from. With base set to /resume, Astro uses that path as the root for pages and assets in development and in the production build.
    Content component
    A component Astro makes available when you import from a Markdown file. It renders the file’s full body as HTML, which is how index.astro displays the resume.
    Static build
    Pre-generated files produced by npm run build. Astro writes them to the dist folder.

    Frequently asked questions

    How do I check whether Node.js is installed on a Mac?

    Run node -v in the terminal. A version number such as v26.13.0 means Node.js is installed. A “not found” message means it still needs to be installed, which is what happened at the start of this walkthrough.

    Which Node.js version does Astro need?

    Astro’s dev environment setup guide lists v22.12.0 as the minimum supported version and says odd-numbered versions are not supported (checked November 2026). This walkthrough used v26.13.0.

    What does the base option in astro.config.mjs do?

    The base option sets the path the site is served from. With base: '/resume', the page works at /resume instead of the main site address, and the dev server URL becomes http://localhost:4321/resume. Astro’s configuration reference describes it as the base path to deploy to, used as the root for pages and assets in both development and the production build.

    Which Astro starter template does this tutorial use?

    It uses the minimal (empty) template, answers Yes to installing dependencies, and answers Yes to initializing a git repository. The contents of src/pages/index.astro are then replaced with a page that renders the Markdown resume.

    How does the index page display a Markdown resume?

    The page frontmatter imports Content from ../data/resume.md, and the page body renders it with a <Content /> component inside a <main> element.

    What URL does the Astro dev server use, and how do I stop it?

    In this walkthrough, npm run dev started the dev server at http://localhost:4321/resume. Press Ctrl+C in the terminal to stop it.

    Why doesn’t http://localhost:4321/ show my resume?

    Because base is set to /resume, the resume page lives under that path. Open http://localhost:4321/resume/ instead of the plain localhost address.

    What does npm run build produce?

    It generates the static production files. In the build output in this article, Astro reports a static output, builds one page, and writes the files to the dist folder inside the project.

    Where do I put the built files so the resume works at /resume?

    Serve the files from the dist folder at the /resume path on your site. Because base is set to /resume, the built page expects to be reachable there rather than at the main site address.

    How do I edit files in vim if I have never used it?

    Open the file with vim filename. Type gg then dG to delete all existing lines, press i to start typing, paste your code, press Esc, then type :wq and press Enter to save and quit. Any text editor works as well.

    Does create-astro create a git commit automatically?

    When you answer Yes to initializing a git repository, the project starts with an initial commit. In this walkthrough, git log showed a commit authored by houston[bot] with the message "Initial commit from Astro".
    Sources and further reading

  • How to Set Up SSH Keys for GitHub on a Mac (Fix “Authentication Failed” on git push)

    Life involves a lot of problem solving. Today, my first one was this: I had forgotten the username and password for one of my GitHub repos, and my current Mac had no SSH keys set up. I don’t regularly work on this repo (an Android app), and I’ve changed devices since I was last active on this project.

    Tested on: a Mac running a macOS version Tahoe 26.6.2 using an ed25519 key.

    Quick answer: how to fix “Authentication failed” on git push by using SSH keys

    A TL;DR for fellow impatient people. 🤪

    If git push fails with “Authentication failed” and your Mac has no SSH keys, create an ed25519 key with ssh-keygen, add it to the SSH agent, and add the public key to your GitHub account under Settings → SSH and GPG keys. Then, remember to change your repo’s remote URL from HTTPS to SSH with git remote set-url!

    Step-by-step quick guide:

    1. Check for existing SSH keys with ls -al ~/.ssh.
    2. Create a new key with ssh-keygen -t ed25519 -C "[email protected]".
    3. Start the SSH agent with eval "$(ssh-agent -s)".
    4. Create ~/.ssh/config so macOS loads your key automatically.
    5. Add the key to the agent with ssh-add --apple-use-keychain ~/.ssh/id_ed25519.
    6. Copy your public key with pbcopy < ~/.ssh/id_ed25519.pub.
    7. Paste the public key into GitHub (Settings → SSH and GPG keys).
    8. Test the connection with ssh -T [email protected].
    9. Switch your repo’s remote to the SSH URL with git remote set-url origin [email protected]:USERNAME/REPO.git.

    And for those who want to dive in to more details, read on~

    The problem: git push says “Repository not found” and “Authentication failed”

    I tried to push to my repo, and Git asked for a username and password I no longer remembered. Entering anything failed with the error below.

    me@my-MacBook-Pro My-App % git push
    Username for 'https://github.com':
    Password for 'https://github.com':
    remote: Repository not found.
    fatal: Authentication failed for 'https://github.com/catzie/My-App.git/'

    Since I had no SSH keys on this device, it was time to set them up.

    Step-by-step: set up SSH keys for GitHub on a Mac

    Step 1: Check for existing SSH keys

    First, I checked whether any keys already existed on my Mac:

    ls -al ~/.ssh

    It found nothing, so I went ahead and created one.

    Step 2: Generate a new ed25519 SSH key

    I created a new SSH key with this command (replace the email with your own):

    ssh-keygen -t ed25519 -C "[email protected]"

    Here is the response I got from the terminal. It asks where to save the key and for an optional passphrase (you can leave it empty for no passphrase).

    Generating public/private ed25519 key pair.
    Enter file in which to save the key (/Users/me/.ssh/id_ed25519):
    Created directory '/Users/me/.ssh'.
    Enter passphrase for "/Users/me/.ssh/id_ed25519" (empty for no passphrase):
    Enter same passphrase again:
    Your identification has been saved in /Users/me/.ssh/id_ed25519
    Your public key has been saved in /Users/me/.ssh/id_ed25519.pub
    The key fingerprint is:
    SHA256:gca01y4Nhsp3ZhFrUnY8ty6VPQiNjBEIt7IVbnFqdx4 [email protected]
    The key's randomart image is:
    +--[ED25519 256]--+
    |    ..=.B*.o     |
    |     =.%.=* o    |
    |    . # X E+ =   |
    |   . O * O .= o  |
    |    + . S +o   . |
    |     . + .. .    |
    |           .     |
    |                 |
    |                 |
    +----[SHA256]-----+

    Step 3: Start the SSH agent

    Next, I started the SSH agent:

    eval "$(ssh-agent -s)"

    This showed me Agent pid 1234. The number at the end will vary.

    Step 4: Create the SSH config file (macOS newer than Sierra 10.12.2)

    Since I use a macOS version newer than Sierra 10.12.2, I had to edit an SSH config file. I tried to open it first:

    open ~/.ssh/config
    The file /Users/me/.ssh/config does not exist.

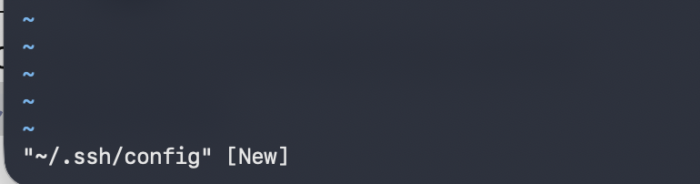
    As you can see, the terminal told me the file doesn’t exist yet. I habitually use vim to quickly edit text files in the terminal, and to create nonexistent ones:

    vim ~/.ssh/config

    This opens a blank text file named “config” located at ~/.ssh/.

    Terminal showing vim opened on a new, blank ~/.ssh/config file

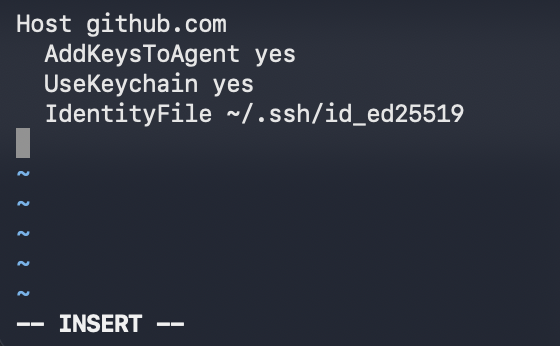
    I pressed the i key to enter vim’s INSERT mode, and then pasted the following text:

    Host github.com
    AddKeysToAgent yes
    UseKeychain yes
    IdentityFile ~/.ssh/id_ed25519
    vim in INSERT mode with the GitHub SSH config pasted into ~/.ssh/config
    Trivia: what does the ~ in ~/.ssh/id_ed25519 mean?

    In Mac and Linux terminals, the ~ symbol automatically translates to your user’s home directory, which on a Mac is usually /Users/YourUsername. If your Mac username is me, the terminal reads ~/.ssh/id_ed25519 and expands it to /Users/me/.ssh/id_ed25519 behind the scenes.

    Note: if you chose not to use a passphrase, you may omit the UseKeychain line from the config.

    If you see a “Bad configuration option: usekeychain” error, add an IgnoreUnknown UseKeychain line to the same Host github.com section of the config, above the UseKeychain line:

    Host github.com
    IgnoreUnknown UseKeychain
    AddKeysToAgent yes
    UseKeychain yes
    IdentityFile ~/.ssh/id_ed25519

    To save the config file and exit vim, I pressed the Escape key, typed :wq!, and pressed Enter.

    Step 5: Add your SSH key to the agent

    Then I ran this command:

    ssh-add --apple-use-keychain ~/.ssh/id_ed25519

    Note: omit --apple-use-keychain if you didn’t set a passphrase.

    The terminal responded with:

    Identity added: /Users/me/.ssh/id_ed25519 ([email protected])

    Step 6: Copy your public key

    Now it’s time to add the key to my GitHub account! I copied the contents of my public key file (~/.ssh/id_ed25519.pub) to my clipboard with this command:

    pbcopy < ~/.ssh/id_ed25519.pub

    Step 7: Add the public key to your GitHub account

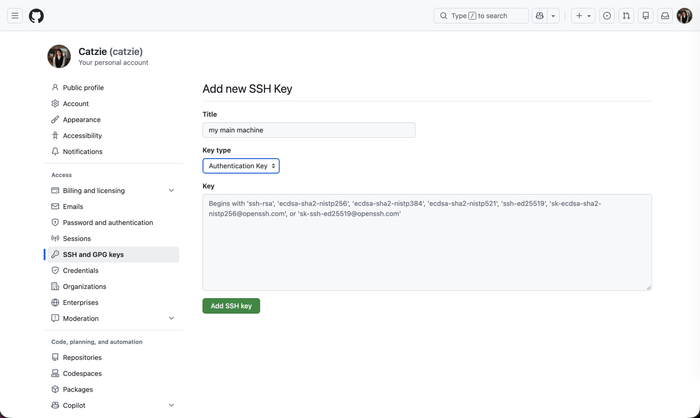
    In my web browser, I went to github.com and navigated to Settings → SSH and GPG keys. I entered the title I wanted to label this key with, and selected Authentication Key as the key type. For the key itself, paste the contents of the local ~/.ssh/id_ed25519.pub file from your machine.

    GitHub Settings page for adding a new SSH key, with title, key type, and key fields

    Step 8: Test your SSH connection to GitHub

    After setting up the key with GitHub, I tested the SSH connection:

    ssh -T [email protected]

    It worked! The screenshot below shows the response I got. Note that every user connecting to GitHub.com via SSH using ED25519 sees that exact same fingerprint: SHA256:+DiY3wvvV6TuJJhbpZisF/zLDA0zPMSvHdkr4UvCOqU.

    Terminal output of ssh -T git@github.com showing the GitHub ED25519 fingerprint

    Step 9: Switch your Git remote from HTTPS to SSH

    Time to test on the real thing: pushing my new Android app commits. But Git still prompted me for a username and password!

    This is because my Git remotes were still pointing to HTTPS URLs instead of SSH. I confirmed it with:

    git remote -v
    origin  https://github.com/catzie/My-App.git (fetch)
    origin  https://github.com/catzie/My-App.git (push)

    I visited my repo page on GitHub to get the SSH URL, which looks like [email protected]:catzie/My-App.git, and then updated the remote URL:

    git remote set-url origin [email protected]:catzie/My-App.git

    Running git remote -v again showed the remotes now use SSH:

    git remote -v
    origin  [email protected]:catzie/My-App.git (fetch)
    origin  [email protected]:catzie/My-App.git (push)

    Finally, I ran git push again within my Android Studio project and it successfully did as told. 😎 This is because the git remote is now pointing to the SSH URL, and should authenticate with the SSH key instead of prompting me again for username and password (which I already remembered! But not willing to type over and over again!)

    Common problems and fixes

    ProblemCauseFix
    git push shows “Repository not found” and “Authentication failed”Forgotten GitHub credentials and no SSH keys set up on this deviceFollow steps 1 to 9 above to set up an SSH key
    git push still asks for a username and password after adding the SSH keyThe Git remote still points to an HTTPS URLRun git remote set-url origin [email protected]:USERNAME/REPO.git (step 9)
    “Bad configuration option: usekeychain”The UseKeychain option isn’t recognizedAdd IgnoreUnknown UseKeychain to the Host github.com section, above the UseKeychain line (step 4)
    open ~/.ssh/config says the file does not existThe config file hasn’t been created yetCreate it with vim ~/.ssh/config (step 4)
    No passphrase set on the keyThe keychain options are only needed for passphrasesOmit the UseKeychain config line and the --apple-use-keychain flag

    Frequently asked questions

    Why does git push still ask for my username and password after I set up an SSH key?

    Your Git remote is probably still using an HTTPS URL. Run git remote -v to check. If it shows https://github.com/..., switch it to the SSH URL with git remote set-url origin [email protected]:USERNAME/REPO.git.

    How do I check if I already have SSH keys on my Mac?

    Run ls -al ~/.ssh in the terminal. On my Mac it found nothing, which is how I knew I needed to create a new key.

    Do I need a passphrase for my GitHub SSH key?

    The ssh-keygen prompt lets you leave the passphrase empty. If you choose no passphrase, you can omit the UseKeychain line from your ~/.ssh/config and the --apple-use-keychain flag from ssh-add.

    How do I test my SSH connection to GitHub?

    Run ssh -T [email protected] after adding your public key to your GitHub account. Every user connecting to GitHub.com over SSH with ED25519 sees the same fingerprint, SHA256:+DiY3wvvV6TuJJhbpZisF/zLDA0zPMSvHdkr4UvCOqU.

    How do I fix the “Bad configuration option: usekeychain” error?

    Add the line IgnoreUnknown UseKeychain to the Host github.com section of ~/.ssh/config, above the UseKeychain line.

    Which macOS versions need the SSH config file?

    I needed it because I use a macOS version newer than Sierra 10.12.2. The config file tells SSH to add your key to the agent automatically, to use the keychain, and which identity file to use for github.com.

    Command cheat sheet

    All the commands from this guide, in order. Replace the email, username, and repo name with your own.

    # 1. Check for existing keys
    ls -al ~/.ssh
    
    # 2. Generate a new ed25519 key
    ssh-keygen -t ed25519 -C "[email protected]"
    
    # 3. Start the SSH agent
    eval "$(ssh-agent -s)"
    
    # 4. Create the SSH config file
    vim ~/.ssh/config
    
    # 5. Add the key to the agent (omit --apple-use-keychain if no passphrase)
    ssh-add --apple-use-keychain ~/.ssh/id_ed25519
    
    # 6. Copy the public key, then paste it into GitHub
    pbcopy < ~/.ssh/id_ed25519.pub
    
    # 7. Test the connection
    ssh -T [email protected]
    
    # 8. Switch the remote from HTTPS to SSH
    git remote -v
    git remote set-url origin [email protected]:USERNAME/REPO.git
  • Freshened up this site…

    In response to the recent PHP vulnerability issue, I spent some time here in this blog site to upgrade my WordPress theme, plugins, WordPress installation itself, and finally, the PHP version.

    One minor issue was encountered after upgrading plugins — Head, Footer and Page Injection plugin began showing parts of some code that I inserted, as plain text in my blog site!! I noticed that the plugin had a notice stating that “php is not allowed in your code (disabled by your theme or a plugin)”. The fix that worked was to head over to the plugin’s settings page (Settings -> Head and Footer) and then go to the ‘Advanced’ tab, and then toggle on the setting labeled as “Enable PHP execution”.

    The PHP version I was using was quite outdated T_T and so upgrading to version 8.0 broke my blog site with the error “there has been a critical error on this website.” Fortunately, the thing that I deactivated first was the exact cause of error: my old, outdated theme! It was “Sparkling” theme, which I hadn’t touched for years. I changed into the Twenty Twenty-Five theme for a fresh look and updated WP code. Thank you, Colorlib for the Sparkling theme — it served me well for several years!

    I feel good after taking the time to update this site. I’ve had this for over a decade now.

  • Installing git on a macbook

    Setting up Android Studio on a freshly reformatted MacBook, I got this error:
    Git is not installed
    xcode-select: note: No developer tools were found, requesting install. If developer tools are located at a non-default location on disk, use sudo xcode-select --switch path/to/Xcode.app to specify the Xcode that you wish to use for command line developer tools, and cancel the installation dialog. See man xcode-select for more details.

    (more…)
  • Spoofing Battery and Forcing Sleep (Android Development)

    I wanted to do something with my Android phone using ADB commands, while keeping it plugged in to run the said commands. However, the thing I wanted to test was related to the idle (dozing or asleep) mode of Android devices. The workaround was to spoof the battery state to bypass Android’s charging restrictions.

    Spoofing Battery Charging Status and Forcing Android Device to Sleep (Idle Mode)

    • Turn off the device screen using the physical power button.
    • Trick Android into thinking the device is running on battery power: adb shell dumpsys battery unplug
    • Force the device to step into deep Doze mode: adb shell dumpsys deviceidle force-idle
    • Verify the device is successfully spoofed and asleep: adb shell dumpsys deviceidle get deep (This should return IDLE).

    Can also do:
    adb shell dumpsys battery unplug && adb shell dumpsys deviceidle force-idle && adb shell dumpsys deviceidle get deep

    Device Cleanup for Spoofed Battery and Forced Sleep (Crucial!)

    1. Once testing is done, you must tell the OS to start reading the actual battery state again, otherwise it won’t charge properly: adb shell dumpsys battery reset
    2. Bring the device out of idle: adb shell dumpsys deviceidle unforce

    Can also do:
    adb shell dumpsys battery reset && adb shell dumpsys deviceidle unforce && adb shell dumpsys deviceidle get deep

  • Shorter ADB commands for Android Studio Emulator Device targeting

    To target my specific emulator devices on Android Studio with my ADB (Android Debug Bridge) commands, I usually need to type long ones, like in the commands below where i wanna list the contents of a directory:

    adb -s emulator-5554 ls /sdcard/Android/sub/directory/
    adb -s emulator-5556 ls /sdcard/Android/sub/directory/

    When I am working on a new feature or a bug-fix ticket, I try to avoid typing long commands and args over and over again, especially args that are as error-prone as emulator-5554.

    How to shorten the ADB commands that target emulators (Mac OS):

    Open your Zsh config file with an editor. Mine by habit is Vim. Like so:
    vim ~/.zshrc

    Use your arrow keys to go to the very bottom of the file and copy-paste below exact code:

    adbs() {
      port=$1
      shift
      adb -s "emulator-55$port" "$@"
    }


    What it does is creates a new command adbs. I think the addition of s at the end is appropriate because the flag we are trying to work with is the -s flag which stands for “Serial”, for identifying specific emulators.

    The way the new command works is,

    • the $1 captures the first argument you type after adbs and saves it — for example, the 54 in adbs 54.
    • The shift bit removes the first argument from the front so that the actual command to be run will NOT be adb -s "emulator-5554" 54 logcat (wrong!)
    • Finally, the last line adb -s "emulator-55$port" "$@" runs the correct command, inserting the first argument (54 in our example) where $port is, followed by "$@" which grabs the rest of the command after the 54

    Save the changes to the config file and then exit the editor. In Vim I press Esc key, then type :wq! and hit Enter. IIRC my partner questions something about my :wq! usage, but what he points out, I can’t remember.

    After saving the config file, run the following command to make the new shortcut work immediately:

    source ~/.zshrc

    Usage Example:

    Instead of typing the long version:
    adb -s emulator-5554 ls /sdcard/Android/sub/directory/

    We can just type:
    adb -s 54 ls /sdcard/Android/sub/directory/

    Extra: to know what serial numbers of running devices you got, run below command

    adb devices

    Random thoughts: I am grateful to my very first team lead as a software developer (Peng) because he’s the one who inspired me to become comfortable with command line interfaces. Remembering how much I grew as a dev in that team due to high-traffic production databases that we were managing and debugging in realtime. Oh, the source command on the other hand, was something I learned from my current team lead, Maru. I like how much I am growing in this current team, not only as a dev, but also as a person.

    Credit goes to Google Gemini for the above adbs custom command. I had no idea how to write that until today. hehe

  • A random dev brain dump

    I don’t need a reason to randomly post a brain dump on my blog, no?

    • If an Android dev wishes to implement a precise “notification ID” that they want to be able to precisely cancel later (imagine that it plays an annoying alarm tone!) they can go about it either by
      • Using a unique ID tied to that notification’s base entity (e.g., an app’s incoming message) so that NOTIFS WILL STACK, or
      • Using a unique, dedicated ID that is defined as a constant and is defined without ties to the notification’s base entity so that ONLY THE LAST NOTIF WILL BE SHOWN
    • I gotta update my site’s, something..
    • If an Android dev’s soft keyboard covers a text input field when it’s displayed, particularly in Android 15 devices, they may wanna try to add an imePadding modifier to the root element (e.g., Box, Column) because this modifier will take care of spacings whenever the keyboard appears, avoiding issues such as covering the text input field.