Tag: Web Development

  • Manila homemade cakes, cupcakes, cookies, brownies & more desserts at The Tiny Cakery

    Manila homemade cakes, cupcakes, cookies, brownies & more desserts at The Tiny Cakery

    Update: We have rebranded into Catzie’s Cakery.


    When I’m not busy tapping codes on my keyboard, I either watch anime or bake. And there’s this “tiny” baking business in Manila I’m running, and really have a good time baking for people – friends, family, and even people I haven’t met prior to handing over their ordered desserts.
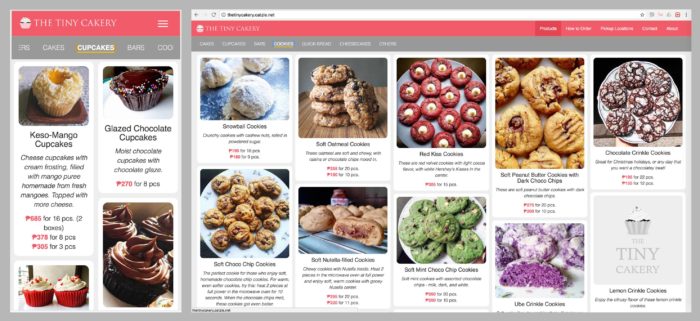
    Last year I launched the official website: The Tiny Cakery, reaching my goal of completing it before year 2016 ends.

    Visit website: http://thetinycakery.catzie.net/
    Visit website: http://thetinycakery.catzie.net/

    Coding it wasn’t easy to me. It’s mostly front-end coding and the masonry grid layout gave me a lot of problem, and combining it with Slick Carousel did not make things simpler due to some conflict.

    Here’s an Instagram video demo of what it looked like shortly before I launched the site:

    It’s not a high-income business — no, it’s not even a medium-income business. I barely make anything with my The Tiny Cakery income. But I really like what I do there and I like the feeling of fulfilment it provides, so I keep doing it. The time when I needed to upload a price list came due to increased number of price inquiry, and I prepared a one-page website for it last year with a price list being its major component. I knew I had to develop a better website, with product grid including photos that will make people drool (lol), and more informative pages so they know right away how to order.

    I worked on the official website later last year in 2016. I won’t call it a “version 2.0” of the older website because I don’t really consider that “price list website” its “official website”.

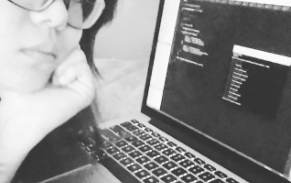
    Catzie coding the Tiny Cakery websiteNext step would be a “baking schedule” calendar where customers will see which days I will be baking the goods, and which days are available for booking a pickup on what available locations in Metro Manila. And after this, I want to add an “Add to Cart” feature, initially with manual payments. I believe that even with manual payments, this will make our lives easier. Instead of long chats with customers, they can simply go to the site, select desired products, select date and time of pickup, and then confirm it with me. After that, they confirm orders by downpayment (standard procedure) and then meet up with me on the set schedule.

    Hoping 2017 brings us more freshly baked homemade desserts by The Tiny Cakery, and more convenient ways to order with the help of technology. <3

  • Installing Laravel 5 on Apache in Mac OS X El Capitan

    Last time, I wrote a guide on How to install Laravel 5 in Windows with XAMPP. I’ve been coding more often on Mac computers recently, and now I need to setup Laravel on a MacBook Pro, so I decided I’ll write a guide on how to install Laravel 5 on Mac OS X El Capitan too. 🙂

    First, I’ll assume you already have a local development environment set up on your Mac.

    Environment Requirements

    This guide won’t cover setting up Laravel on Homestead, so let’s make sure our development environment meets the following requirements:


    • PHP >= 5.6.4
    • OpenSSL PHP Extension
    • PDO PHP Extension
    • Mbstring PHP Extension
    • Tokenizer PHP Extension

    Install Composer

    See the instructions on the Composer download page on how to install composer.

    After installing, you shall get a file composer.phar in the directory where you ran the installation commands for Composer.

    Make ‘composer’ executable from anywhere

    Right now, if you want to run Composer, you will have to navigate to the folder where you stored composer.phar and run a command like php /usr/local/bin/composer.phar. Let’s make our lives easier by creating an alias, an be able to run Composer simply by typing the composer command. 😉

    Let’s move composer.phar to the path /usr/local/bin by running this command:

    And to finally create the alias, type this command to edit bash_profile:

    Add the following line to your bash_profile:

    Restart terminal or open a new terminal tab. Type composer and this should be able to run Composer.

    Download Laravel via Composer

    Navigate to your document root, (mine is at /webcontent) and run the following command to download and install Laravel into a folder named “laravel5”. Change the folder name as you like.

    Now, I will assume that you have your Laravel at this path: /webcontent/laravel5/

    Verify folder permissions

    Update (2016-10-20): I formed the habit of setting permissions of all my bootstrap/cache/* and storage/* directories to 775 (not 755), which means the owner and group members are granted all rights (read, write, execute). 755 will only grant write access to user, and not group members. The owner of all my Laravel files is my own user (e.g., catzie) and the group owner is _www. My own user and the user called _www are both members of the group _www. Permissions on bootstrap/cache and storage/* is drwxrwxr-x

    The contents of the following directories are required to be writable, otherwise, Laravel will not run:

    • storage
    • bootstrap/cache

    Before I set the directories as writable, when I access my Laravel at http://localhost/laravel5/public, I only get an “Error 500” without any detail. Then after setting proper permissions, my Laravel became accessible.

    We are going to set the permission into 755. Some information about 755:

    Tip: you don’t want to set these folders to 777 because you will make attackers happy when they find out they can write to your files/folders! We want to keep attackers unhappy. 😀

    Set permissions on storage folder

    Let’s navigate to /storage then set the permission of /storage contents to 755 through these commands:

    By the way, the -R in the chmod command affects files and directories recursively. It is equivalent to --recursive. The asterisk * lets the chmod apply the change to all contents of present directory /storage.

    Set permissions on bootstrap/cache folder

    After setting 755 as permission on bootstrap/cache, I still had an error, saying file_put_contents(/webcontent/laravel5/bootstrap/cache/services.php): failed to open stream: Permission denied

    To pass the issue, I ran these commands:

    I don’t know why, but setting it to 755 doesn’t work. When I first set to 777, then reset to 755 though, it works!

    Okay, now I get a different error: file_put_contents(/webcontent/laravel5/storage/framework/views/<someHashedString>.php): failed to open stream: Permission denied

    It seems that my /views folder is not writable. But hey, I already set permissions recursively for contents of storage folder! 🙁

    I decided to try the trick I did earlier with bootstrap/cache, which is first setting to 777 then resetting it into 755:

    First, I set it to 777 then viewed Laravel in my browser. It finally loaded the Laravel home screen. But no, I don’t want to leave the folders under /webcontent/laravel5/storage/ with permission 777 because it can be a security risk. So, I set it back to 755:

    I refreshed my browser and Laravel is still running. Whoohoo! Finally!

    If any of you has an idea why setting to 777 then resetting to 755 works, please let me know through the comments area. 😆

    Update: I realized the right thing to do is chmod all directories under storage with 775 to enable group members to write too. And then, chown the folders from “catzie” to “_www”. Since _www is the user who always needs to write to those folders, just let him own them. :p And here I am hoping that I don’t encounter problems when it’s user “catzie” who’s trying to access those folders and their files.

    Update again: My directories and files are owned by group “staff” but only user “catzie” is member of the group called “staff”. This can be checked by the command id -Gn _www and id -Gn catzie. To add user “_www” to the group staff, I will run the following command:

    This -a(dds) “_www”, which is an object of -t(ype) “user”, to the group “staff”. –source

    Create your first Laravel route

    Now that we are able to load the home/welcome page of Laravel, let’s proceed and create a new route.

    With your favorite text editor, open app/Http/routes.php and add the following code:

    When I visited the URL http://localhost/laravel5/public/ohayou, I got this error:

    When I changed AllowOverride None into AllowOverride All in Apache config file /etc/apache2/httpd.conf, all it did was show me the error file_put_contents(/webcontent/laravel5/bootstrap/cache/services.php): failed to open stream: Permission denied again when accessing http://localhost/laravel5/public/ohayou and even the home page.

    y-u-no

    Y U BRING BACK SAME PROBLEM?!

    Despite being potential security risk, this fixed my problem and allowed me to access the URL http://localhost/laravel5/public/ohayou:

    Err, then I tried to set it back to 755 again…

    And yep, still works! I hope this always works from now on. @_@ lalala~

    Test Laravel with MySQL database

    For us to be ready to develop a web app with Laravel, let’s test one last thing: the connection to database. In this section, we’ll use Artisan to run “migrations”.

    Artisan is the command line interface that’s included in Laravel. And when we run migrations, tables are created based on schemas defined in the migrations in the directory /webcontent/laravel5/database/migrations.

    Create database

    I’ll be using Terminal to check MySQL. If you prefer PhpMyAdmin, that’s okay.

    Create a database named “laravel5”:

    Then select that database:

    You’ll see that there are no tables yet, since we only just created the database without adding any table:

    Change database settings on .env file

    When I finished installing Laravel, a .env file was generated for me. In case your installation only has a .env.example file, copy that into a new file that’s named .env

    Now that you have a .env file, go ahead and edit it and fill in the correct values for your database connection. Do change the value of the following:

    Run migration

    Laravel’s pre-made migration files will create tables for us, such as the “users” table.

    Run this so that the migrations create database tables:

    Oops, I got an error again: PHP Fatal error: Uncaught exception 'UnexpectedValueException' with message 'The stream or file "/webcontent/laravel5/storage/logs/laravel.log" could not be opened: failed to open stream: Permission denied' in /webcontent/laravel5/vendor/monolog/monolog/src/Monolog/Handler/StreamHandler.php:107

    Ohhh, I checked the details about the file laravel.log located at /webcontent/laravel5/storage/logs and this is what I found:

    I believe that laravel.log is generated by Laravel… which means that the user laravel uses is _www and not MY user. But we are at the same “group”. Maybe the right thing to do is simply add “write” permission to “group”.

    Lemme try that with this command…

    And now, this is what my laravel.log looks like:

    Whoa, it worked! retried my php artisan migrate and the command ran successfully. 😀

    Check if tables are created

    Back to the MySQL command line, I’m running these commands to check if tables have been created:

    There you have it! Laravel can connect to your MySQL database. 🙂

    Command reference:

    To create new user and grant it all privileges to an existing database, use this:

    Possible hiccups and solutions/workaround

    No supported encrypter found when running php artisan route:list

    When I run the command php artisan route:list to get a list of my Laravel routes, I got the error:

    To fix this, make sure you have a .env file in your Laravel root directory. If you don’t, copy and rename from .env.example then edit the values as needed.

    Then, run this on your Terminal: php artisan key:generate which should generate and save a key on your .env file.

    If that still doesn’t work, maybe it has something to do with the cipher you are using. Edit config/app.php and set the value of cipher to 'AES-256-CBC' so that you have 'cipher' => 'AES-256-CBC',

    Now try to run php artisan route:list again.

    Explanation:

    For Laravel 5.1, if the .env file does not exist, duplicate the .env.example file, rename it to .env, then run php artisan key:generate (as opposed to hardcoding a default in the config/app.php file).
    The artisan command should update the APP_KEY in the .env file with a 32 character string to match the length expected by the ‘cipher’ => ‘AES-256-CBC’ (in the config/app.php file).
    Source: No supported encrypter found. The cipher and / or key length are invalid.

    PDOException when running php artisan migrate

    I wanted to run php artisan migrate in Laravel to generate by database tables but I was getting this error:

    What fixed this issue for me was changing DB_HOST value in .env from ‘localhost’ to ‘127.0.0.1’. This is a known issue in my Mac. I need to use 127.0.0.1 in web app settings to use the database. Hope I find time to fix it 😆

    Reference(s):
    Add a user to the admin group via command line
    Setting folders as writable in Unix systems
    Installing Composer on OS X
    CHMOD settings
    Making some Laravel folders writable
  • PHP: Parse Dates in CSV with inconsistent date formats

    A friend was having trouble with a CSV file that she needs to process via PHP before saving to database. The CSV files uploaded to the server have inconsistent date formats such as:

    So I prepared a PHP script that lists possible date formats in an array $possible_date_formats and then iterates through the dates read from the CSV file, matching each against the date formats in the array.

    Assuming you have a .csv file with tab-delimited data such as this:

    My PHP file will output this when it’s run:

    And below is the PHP file I’m talking about.

  • Install & config Apache, MySQL and PHP on your Mac (MAMP)

    Install & config Apache, MySQL and PHP on your Mac (MAMP)


    There’s a Mac computer that I want to use as local development server for web apps. I don’t want to use bundled installers like XAMPP or MAMP because I feel that I will learn more about Apache if I install each component of the LAMP stack separately. By the way, one of my goals is to be an expert in the LAMP stack. And prior to writing this blog entry, I had only been concerned about the actual coding of web apps, and have never had the chance or need to play with the installation and configuration of Linux, Apache, MySQL and PHP as individual components since there’s always been XAMPP and MAMP for easy setup in my local environment. And at work, someone else is always in charge of setting up our Linux server and the rest of the things we need for our production environment.

    I also plan to setup a LAMP environment on my Mac by using VirtualBox to create a virtual machine with Linux, but I’m saving that for another post if it happens. 😆

    Here in this blog entry, I shall take note of the steps that I take as I setup Apache, MySQL and PHP on Mac.

    My environment

    Computer: MacBook Pro
    Operating System: OS X El Capitan version 10.11.5
    I’ll be using the Terminal and Vim editor

    Apache, MySQL, and PHP versions that I will setup:

    Apache: version 2.4.18 (bundled with El Capitan, default)
    MySQL: version 5.7.15 (installed via Homebrew)
    PHP: version 5.5.34 (bundled with El Capitan, default)

    I have no MAMP, XAMPP or any bundled *AMP stack installed on my Mac, so I will have fresh install of MySQL.

    Start Apache on your Mac

    Apache is already in OS X El Capitan so I just need to set it up. If you want to check your Apache version, run the command httpd -v in Terminal. Mine is Apache version 2.4.18.

    Type this command in Terminal to start Apache on your Mac:

    Now that we started Apache, you should now be able to access the URL http://localhost/.

    Start PHP on your Mac

    Maybe you expected this section to be for MySQL setup, but I’m going to work with PHP first since it should be already in OS X El Capitan, like Apache.

    Also, as of writing, the latest PHP version is 7 but I want to take one little step at a time as I write this so I’ll stick with the PHP 5 bundled with my Mac. I will try to post another blog entry on how to upgrade from PHP 5 to PHP 7. 🙂

    We are going to edit the Apache configuration file to enable PHP on Mac, but for now let’s make a back up of the file. Let’s do that by running these commands:

    Notice the 20160910 in the command sudo cp httpd.conf http.conf.20160910.bak. It’s the date when I made a backup. You may change the date or even delete it.

    Open Vim to edit httpd.conf by running this command:

    Find the following line in httpd.conf and uncomment it:

    Remove the hash symbol (#) at the beginning of that line to uncomment it.

    Vim editor tip: when you open the httpd.conf file, search for the line containing “php5_module” by pressing the esc key to make sure you’re not in INSERT mode, then type /php5_module and then hit the return/enter key. Vim should point you to the line that you should uncomment. Press the “i” key to enter INSERT mode in Vim, and uncomment that line. To save the file, press esc key again and type :wq!

    Now, restart Apache to reflect the change:

    Check if PHP works

    Run these commands:

    Press the “i” key to enter INSERT mode again, then place this PHP code into temp_phpinfo.php:

    Then using your web browser, go to http://localhost/temp_phpinfo.php

    If the page shows a table of details about PHP, then PHP now works on your Mac. Good job! 🙂

    I recommend that you delete this temp_phpinfo.php file though, and avoid using phpinfo() especially in production servers because it can lead to security issues. It will be easier for attackers to hack into your system when they see all the details that phpinfo() exposes.

    Install MySQL

    Install Homebrew if you haven’t yet. I choose to install MySQL with Homebrew because I find the process simple.

    Run this command to install MySQL via Homebrew:

    The installation process on my Mac looked like this:

    By default, Homebrew installs MySQL without root password, and with this setup, you can now log into MySQL by typing:

    But wait! Securing MySQL with a password is highly recommended, and if you agree, run this command:

    With a password for root set, you should access MySQL with this command instead, adding a -p to the command for a password prompt:

    MySQL command line on a Mac Mini with MAMP bundle installed

    The Mac Mini I’m using at work already has MAMP installed, but I followed the steps for setting up Apache, MySQL and PHP in this page just to test. Since MAMP is already installed, I already have MySQL.

    So, before using MySQL via command line, simply start your MySQL server from MAMP and then use command line MySQL by logging in like this:

    Create sample database table for testing with PHP later

    Run the following commands:

    This is what my MySQL command line interface looked like:

    Make sure PHP can communicate with MySQL

    The following command creates a symbolic link to help point to the right socket for MySQL to use on Mac.

    Reason: “You may have a socket (appearing as a zero length file) as /tmp/mysql.sock or /var/mysql/mysql.sock but 1 or more apps is looking in the other location for it.” – source

    Another option: A fellow developer told me that instead of creating a symbolic link to the socket, he connects directly to localhost:3306, connecting through networking sockets instead of Unix sockets.

    Enable mod_rewrite

    My guide suggests we enable this now to avoid forgetting later that it’s not yet enabled. This will prevent hiccups when we’re already busy with coding web apps.

    Edit the config file with Vim.

    Uncomment the following lines:

    Restart Apache:

    Sample PHP-MySQL code to test your “MAMP” stack

    Remember the table I created earlier? This is when we’re going to use that.

    Run this command, we’re going to paste code into it:

    Paste the following PHP code which SELECTs data from a sample MySQL table. Remember to edit the variable values to match your own settings, especially the password.

    Visit this link on your browser: http://localhost/testsql.php

    It should display this:

    1 catzie
    2 petar
    done

    Move Document Root folder

    Right now, the document root is at "/Library/WebServer/Documents", and you may have noticed that each time we edit a file to create a new file within this folder, we need to sudo. That is inefficient, so let’s move our document somewhere that we won’t have to sudo for each change that we want to make.

    We will move document root from "/Library/WebServer/Documents" to /webcontent.

    Create “webcontent” folder under the root directory /. You can choose any other name you like.

    Let’s create a sample page inside the newly created folder.

    And place anything there such as “Hello!”

    Now, let;s edit the Apache configuration file to point to the /webcontent folder:

    Change the line DocumentRoot "/Library/WebServer/Documents" into /webcontent

    Change the line <Directory "/Library/WebServer/Documents"> into <Directory "/webcontent">

    Restart Apache:

    Visit http://localhost again, and you should see whatever text you placed inside /webcontent/index.html

    Just in case you still need to ‘sudo’ to access /webcontent folder

    Try to copy the /webcontent/index.html file to check if you no longer need sudo in the /webcontent folder:

    If it gives you the error cp: /webcontent/index2.html: Permission denied then here are your options:

    • Option #1: Change ownership of /webcontent folder

      In the Mac Mini I use, the directory permissions for /webcontent is drwxr-xr-x which means only the owner (root) has permissions write to it, unless I sudo as another user, which is not convenient if I need to edit many files.

      What we can do is change ownership of /webcontent from “root” user to our own user, like so:

      Now try to create or edit files under the /webcontent folder. Your system should no longer deny you permission, since it is owned by you. So far I have not encountered a problem yet with this setup.

    • Option #2: Move document root under your user folder

      You can try to move your document root under your user folder, i.e. ~/ or /Users/<yourUsername>, and see if you can edit files there without the need for sudo. Your user is the owner of this folder so you shouldn’t need additional permissions to edit files under it.

    On my MacBook Pro, I no longer had to sudo when I edit files in new document root /webcontent, but on another Mac computer that I use (Mac Mini), I still needed sudo to edit files in document root. I will edit this blog entry when I find a way to avoid this.

    Tested on:

    Computer: Mac Mini
    Operating System: OS X El Capitan version 10.11
    Apache: 2.4.16 (bundled with El Capitan)
    PHP: 5.5.27 (bundled with El Capitan)
    MySQL: 5.5.34 (bundled with installed MAMP)

    Extras…

    How to stop Apache on your Mac

    Type this command in Terminal to stop Apache on your Mac:

    or

    Based on my observation, when I start and stop Apache multiple times, the stop command with -k only works on the first time. Succeeding commands for stopping Apache becomes just sudo apachectl stop.

    How to check version of Apache, MySQL and PHP

    Apache version:

    or

    MySQL version:

    If using MAMP bundle, MySQL service should be running when you use this command:

    The welcome screen should show MySQL version when you login to MySQL via command line:

    PHP version:

    ERROR 2002 (HY000): Can’t connect to local MySQL server through socket ‘/tmp/mysql.sock’ (2)

    When I got this error regarding a socket (my MySQL is installed via Homebrew), it was fixed when I started MySQL by running the following command:

    I think the same command is used for both starting and restarting of the MySQL server. Note that this is the command I use for my MySQL that’s installed via Homebrew. If you have MAMP GUI and not the MySQL from Homebrew, simply use that interface to start your MySQL service.

    Reference(s):
    Install MySQL on Mac OSX with Homebrew
    Running Simple Select Statements
    symbolic link setup for correct socket file locations in Mac OS X for MySQL
    Version of Apache in Mac
    Main Guide: Installing Apache, PHP, and MySQL on Mac OS X El Capitan

  • Web Security: How SQL Injection is done


    SQL injection is one of the most common website exploits. For us developers to prevent SQL injection attacks, we must first understand how it’s done. Together, let’s review the basics of SQL injection.

    Remember, let’s use our knowledge on good things only, okay?

    Okay meme

    The scope of this post is only a MySQL injection sample from PHP code. I am on a Windows 7 computer, using Git Bash and running SQL commands via command line, and coding my PHP file via VIM editor. My localhost is run by XAMPP.

    I will be using MySQL, not MySQLi or PDO which have prepared statements, because the SQL injection is easier to demonstrate in MySQL.

    Create database

    I’m running these commands via command line.

    What I do is run the mysql command like this: path_to/xampp/mysql/bin/mysql -h localhost -uMyUsername -pMyPassword


    Then run use MyDatabaseName; to select a database.

    This is a very simple database table with only 3 columns: the primary key “id”, “name”, and “secret”. The value of “secret” column, as its name implies, is user’s secret so nobody else should know about this, especially unauthorized users.

    Then insert data using the following commands:

    As you can see, those are dirty little secrets of our users, which in my case, are dogs in my house. :3

    epi-pinky-asia-dogs-chihuahua

    They are cute little chihuahuas who have embarrassing secrets just like humans. But because I’m using their secrets are samples in my database, these secrets won’t be secrets any longer. I also need to not secure my script for demo purpose. Sorry little babies 🙁 The readers don’t know you personally anyway. Hehehe

    show tables; in mysql command line should show that 3 rows have been inserted.

    Unsecured PHP script that runs MySQL query

    Let’s save this as path_to/xampp/htdocs/test_sql_injection.php

    Expectation vs. Reality

    Expectation: The PHP script should be accessible through this URL: http://localhost/test_sql_injection.php since we saved it in the htdocs folder. We will be able to query the ‘users’ table by supplying a GET param called “name” in the URL, like so: http://localhost/test_sql_injection.php?name=epi and the script will show us the id, name, and secret of the matched row.

    It should be safe as long the attacker only searches for a name that he/she already knows, right? Hmm, nope!

    Reality: If the attacker passes malicious string as GET parameter, he/she can view ALL rows in our users table.

    How? I’ll walk you through it.

    Exploiting the vulnerability of PHP script via SQL Injection

    Note: Originally, my PHP script had $_POST data instead of $_GET and I was POSTing the ‘name’ for the query via curl --data "name=A' OR 'x'='x" http://localhost/catzie_injection.php. After changing it into GET, I couldn’t hack the script with the same string value passed to ‘name’. I don’t know why. So to make life easier, let’s just hack it by accessing the URL via web browser.

    Imagine yourself as a curious person with potential in hacking, and pretend you don’t know what we inserted to the database earlier! 😆

    meme challenge accepted

    Access the following URL with your browser:

    It should should give you information about the user named Epi. Here’s what it shows:

    Connected to db
    your input param is epi
    Your MySQL query is: SELECT * FROM users WHERE name = 'epi'
    id: 1, name: Epi, secret: I eat poop. Don't tell mommy.
    That is all!

    yuck meme

    Oops, we saw Epi’s secret! That’s literally a dirty little secret, isn’t it? But that’s ok, because Epi told us we can look up her secret in this database.

    Now, aren’t you curious about the secret of other users in the database? Aren’t you tempted to hack into the database?

    How can we hack this script so that we could view all database rows, and not just Epi’s details?

    Let’s try this URL, with empty query:

    Uhhh, nope. I only got this:

    Connected to db
    missing name param

    meme-face-thinking

    Ooh, I know! Maybe I can manipulate the query string of the PHP string!!!

    Let’s try this now:

    I got this result in my browser:

    Connected to db
    your input param is x' or 'x'='x
    Your MySQL query is: SELECT * FROM users WHERE name = 'x' or 'x'='x'
    id: 1, name: Epi, secret: I eat poop. Don't tell mommy.
    id: 2, name: Pinky, secret: I'm a spoiled brat who's always fighting with other dogs
    id: 3, name: Asia, secret: I eat too much my belly is touching the floor
    That is all!

    success-meme-face

    Now we know the secrets of other users. 😆

    The danger

    You should understand by now that this vulnerability can lead to exposure of even more sensitive information to the attacker, such as passwords, contact numbers, addresses, etc.

    Explanation of how we hacked to see all database rows

    How did that happen? It’s all in the manipulated query!

    The intention of the PHP script is to construct a query like this:

    But instead of passing a real name, we passed this value:

    Notice that we did not add a quote at the beginning and end of the value. It’s because that value is inserted between the single quotes in my PHP script’s query string, so that it produces this query:

    The 'x'='x' in the WHERE clause will always return true, and since “or” only requires one true value, then every row in the database becomes a match for the SELECT query.

    How to prevent SQL injection attacks like this?

    Sorry but I won’t cover tutorials on how to do that in this post.

    meme are you kidding me

    Now, now, don’t get mad! Basically, what you need to do is use “prepared statements” with MySQLi or PDO.

    Please refer to the following articles that will give you precise instructions on how to secure your PHP scripts and web apps so that you could prevent SQL injection attacks.

  • Prevent direct access to directories of subdomains

    From my hosting platform (e.g. cPanel), I created two subdomains for web apps.

    The web apps reside in the following directories:
    /foo/bar/app_one/
    /foo/bar/app_two/

    And the subdomains I created are accessed through these URLs:
    http://app_one.bar.domain.com (pointing to /foo/bar/app_one/ directory)
    http://app_two.bar.domain.com (pointing to /foo/bar/app_two/ directory)

    For security purpose, I don’t want anyone to access the web app directories via these URLs:
    http://domain.com/foo/bar/app_one/
    http://domain.com/foo/bar/app_two/

    So, I updated the .htaccess in my public_html and added this:

    With these lines added, anyone who tries to go to http://domain.com/foo/bar/app_one/ is redirected to http://app_one.bar.domain.com

    Reference/Source: Prevent Access to Subdomain Folder from Main Domain

  • Laravel 5: activate API token guard and print “Unauthorized” instead of login redirect

    In Laravel 5, I wrap my API routes in a route group like this:

    Notice that I use auth:api and throttle on my middleware array.

    auth:api turns on the auth middleware with API token as guard, while throttle activates rate limiter for APIs.

    To get started with API token authentication, you may read https://gistlog.co/JacobBennett/090369fbab0b31130b51.

    I followed the same tutorial to set mine up, but had this issue: Upon using invalid api_token or no token at all, I am redirected to the /login route, which in my case is a currently nonexistent route.

    As instructed by the guide, I already edited my app/Http/Middleware/Authenticate.php file to add the || $request->wantsJson() condition, but my API routes still redirected to /login route upon detection of invalid api_token.

    The solution

    What I did was add another condition: || $guard == "api"

    And now, my app/Http/Middleware/Authenticate.php file looks like this: