Author: Catzie

  • Shorter ADB commands for Android Studio Emulator Device targeting

    To target my specific emulator devices on Android Studio with my ADB (Android Debug Bridge) commands, I usually need to type long ones, like in the commands below where i wanna list the contents of a directory:

    adb -s emulator-5554 ls /sdcard/Android/sub/directory/
    adb -s emulator-5556 ls /sdcard/Android/sub/directory/

    When I am working on a new feature or a bug-fix ticket, I try to avoid typing long commands and args over and over again, especially args that are as error-prone as emulator-5554.

    How to shorten the ADB commands that target emulators (Mac OS):

    Open your Zsh config file with an editor. Mine by habit is Vim. Like so:
    vim ~/.zshrc

    Use your arrow keys to go to the very bottom of the file and copy-paste below exact code:

    adbs() {
      port=$1
      shift
      adb -s "emulator-55$port" "$@"
    }


    What it does is creates a new command adbs. I think the addition of s at the end is appropriate because the flag we are trying to work with is the -s flag which stands for “Serial”, for identifying specific emulators.

    The way the new command works is,

    • the $1 captures the first argument you type after adbs and saves it — for example, the 54 in adbs 54.
    • The shift bit removes the first argument from the front so that the actual command to be run will NOT be adb -s "emulator-5554" 54 logcat (wrong!)
    • Finally, the last line adb -s "emulator-55$port" "$@" runs the correct command, inserting the first argument (54 in our example) where $port is, followed by "$@" which grabs the rest of the command after the 54

    Save the changes to the config file and then exit the editor. In Vim I press Esc key, then type :wq! and hit Enter. IIRC my partner questions something about my :wq! usage, but what he points out, I can’t remember.

    After saving the config file, run the following command to make the new shortcut work immediately:

    source ~/.zshrc

    Usage Example:

    Instead of typing the long version:
    adb -s emulator-5554 ls /sdcard/Android/sub/directory/

    We can just type:
    adb -s 54 ls /sdcard/Android/sub/directory/

    Extra: to know what serial numbers of running devices you got, run below command

    adb devices

    Random thoughts: I am grateful to my very first team lead as a software developer (Peng) because he’s the one who inspired me to become comfortable with command line interfaces. Remembering how much I grew as a dev in that team due to high-traffic production databases that we were managing and debugging in realtime. Oh, the source command on the other hand, was something I learned from my current team lead, Maru. I like how much I am growing in this current team, not only as a dev, but also as a person.

    Credit goes to Google Gemini for the above adbs custom command. I had no idea how to write that until today. hehe
  • A random dev brain dump

    I don’t need a reason to randomly post a brain dump on my blog, no?

    • If an Android dev wishes to implement a precise “notification ID” that they want to be able to precisely cancel later (imagine that it plays an annoying alarm tone!) they can go about it either by
      • Using a unique ID tied to that notification’s base entity (e.g., an app’s incoming message) so that NOTIFS WILL STACK, or
      • Using a unique, dedicated ID that is defined as a constant and is defined without ties to the notification’s base entity so that ONLY THE LAST NOTIF WILL BE SHOWN
    • I gotta update my site’s, something..
    • If an Android dev’s soft keyboard covers a text input field when it’s displayed, particularly in Android 15 devices, they may wanna try to add an imePadding modifier to the root element (e.g., Box, Column) because this modifier will take care of spacings whenever the keyboard appears, avoiding issues such as covering the text input field.
  • Fix “Error loading build artifacts” error (Android Studio after upgrade)

    Quick Guide Summary:

    • Fixes the “Error loading build artifacts” (redirect.txt) error when running an app on an emulator after upgrading Android Studio from Ladybug to Otter.
    • Run the AGP Upgrade Assistant to bump Gradle 8.10.2 → 8.13 and AGP 8.8.1 → 8.13.2 in gradle-wrapper.properties and libs.versions.toml.
    • Remove and re-add “Gradle-aware Make” under Edit Configurations → Before Launch, leaving the task field empty.

    Problem:

    After upgrading Android Studio from “Ladybug” to “Otter” I started getting the following error message when I run my app on my emulated test device:

    "Error loading build artifacts from: .../myProjectRootDir/app/build/intermediates/apk_ide_redirect_file/productionDebug/createProductionDebugApkListingFileRedirect/redirect.txt"

    Solution:

    First, I ran the AGP Upgrade Assistant, which updated 2 files:

    • .../myProjectRootDir/gradle/wrapper/gradle-wrapper.properties
      Distribution URL has been upgraded from distributionUrl=https\://services.gradle.org/distributions/gradle-8.10.2-bin.zip to distributionUrl=https\://services.gradle.org/distributions/gradle-8.13-bin.zip
    • .../myProjectRootDir/gradle/libs.versions.toml
      AGP version updated from agp = '8.8.1' to agp = '8.13.2'

    And then, applied a “Run Configuration” Fix:

    1. Click the Edit Configurations dropdown (next to the “Play” button).
    2. Select your app configuration on the left.
    3. Scroll to the “Before Launch” section at the bottom.
    4. Remove “Gradle-aware Make” (select it and click the minus – button).
    5. Re-add it: Click +, select Gradle-aware Make, and leave the task field empty. Click OK.
    6. Click Apply -> OK.
    7. Run the app.

    Additional things to try if above suggestions weren’t sufficient to fix the issue:

    • Invalidate caches
    • Clean the build before re-running
    • Sync Gradle files
  • Android emulator shell list fails: Permission Denied in app directory

    Today I learned I should include the app package name after shell in my ADB command, if for example I want to list files under the “subdirectory/media” directory of an app, like so:

    adb -s emulator-5556 shell run-as com.domain.my.app ls -al /data/user/0/com.domain.my.app/subdirectory/media

    First try’s command below failed with a Permission Denied error message:

    adb -s emulator-5556 shell ls -al /data/user/0/com.domain.my.app/subdirectory/media

    Makes sense, right? Because part of Android OS’ security is limiting access to app directories. But if you “run-as” the package owner app itself, it should grant you access.

  • Android: Broadcast sent, receiver registered, but receiver doesn’t receive broadcast

    I should blog more often about things I learn about.

    In a native Android app written in Kotlin, I have a LifecycleService class with below code to send a broadcast:

        val eventIntent = Intent(CUSTOM_EVENT_ACTION_NAME).apply {
        flags = Intent.FLAG_ACTIVITY_NEW_TASK or Intent.FLAG_ACTIVITY_CLEAR_TOP
        }
        applicationContext.sendBroadcast(eventIntent)
        Log.d("AppTag", "Broadcast sent!")


    Based on the logcat, the broadcast is being sent.

    However, below BroadcastReceiver in an Activity doesn’t receive the broadcast, even while it is visible:

    
    private val customEventReceiver = object : BroadcastReceiver() {
        override fun onReceive(context: Context?, intent: Intent?) {
            Log.d("AppTag", "Custom event receiver triggered")
            if (intent?.action == GlobalConstants.CUSTOM_EVENT_ACTION_NAME) {
                Log.d("AppTag", "Confirmed action match, proceeding with task.")
                performSpecificTask()
            }
        }
    }

    The above BroadcastReceiver is registered from the Activity’s onCreate function, like so:

    val filter = IntentFilter(GlobalConstants.CUSTOM_EVENT_ACTION_NAME)
    ContextCompat.registerReceiver(
        this,
        customEventReceiver,
        filter,
        ContextCompat.RECEIVER_NOT_EXPORTED 
    )


    Attempt #1: LocalBroadcastManager – it worked, but…

    After browsing the web for potential solutions I came across LocalBroadcastManager. The broadcast was successfully received by the receiver after I changed the sendBroadcast’s applicationContext and the registerBroadcast’s ContextCompat into LocalBroadcastManager.getInstance(Context).

    That is, LocalBroadcastManager.getInstance(applicationContext).sendBroadcast(eventIntent) and LocalBroadcastManager.getInstance(this).registerReceiver(customEventReceiver, filter).

    The problem with this approach is that LocalBroadcastManager has been deprecated:

    Important changes since 1.0.0

    androidx.localbroadcastmanager has been fully deprecated. There will be no further releases of this library. Developers should replace usages of LocalBroadcastManager with other implementations of the observable pattern. Depending on the use case, suitable options may be LiveData or reactive streams.

    https://developer.android.com/jetpack/androidx/releases/localbroadcastmanager

    Ideally, the solution should not be a deprecated one.

    As to why LocalBroadcastManager made my receiver work, I think it’s because it “bridged” 2 components that weren’t really supposed to be able to communicate. Because from the Android docs:

    LocalBroadcastManager is an application-wide event bus and embraces layer violations in your app: any component may listen events from any other.

    Why it works, and why it’s been deprecated, apparently have the same explanation. 😅

    Attempt #2: Use applicationContext on the sender and receiver — Nope!

    I reverted my code to the original, and just made sure they all used applicationContext, matching the context used in the service’s broadcast sender applicationContext.sendBroadcast(eventIntent).

    So that my registration became:

    val filter = IntentFilter(GlobalConstants.CUSTOM_EVENT_ACTION_NAME)
    ContextCompat.registerReceiver(
        applicationContext,
        customEventReceiver,
        filter,
        ContextCompat.RECEIVER_NOT_EXPORTED 
    )
    
    
    And the code to unregister became:
    
    applicationContext.unregisterReceiver(customEventReceiver)

    Hmm… Nope! that didn’t let my receiver get the broadcast.

    Attempt #3: Make it an explicit broadcast — YES, IT WORKS!

    I reverted my code again to try another approach, which is to make the broadcast an explicit one.

    So, in my service, I simply set the package name as shown in code below:

    val eventIntent = Intent(CUSTOM_EVENT_ACTION_NAME).apply {
        setPackage(applicationContext.packageName)
        //...

    And with this 1 line changed in code, my BroadcastReceiver now receives the broadcast! Plus, there’s no deprecated class used here so we prevented 1 new technical debt. :3

    Yeah, I think I’ll stick to the 3rd attempt’s approach!

    Why does this approach work, though? It’s because starting from Android API level 26, there’s been restriction on implicit broadcasts.

    As part of the Android 8.0 (API level 26) background execution limits, apps that target the API level 26 or higher can’t register broadcast receivers for implicit broadcasts in their manifest unless the broadcast is sent specifically to them. However, several broadcasts are exempted from these limitations. 

    https://developer.android.com/develop/background-work/background-tasks/broadcasts/broadcast-exceptions

    My original code’s broadcast Intent was an implicit one, but specifying a package name converted it into an explicit one, consequently lifting the limitation applied to implicit broadcasts!

  • Fountain pen inks & papers least sensitive to hand cream or oil

    I have been using fountain pens these days to reduce the pressure on my hand, as I hand-write quite frequently, both for work (for problem solving and work journaling) and for personal (journaling, planning, common-placing, etc.).

    But as someone who needs to apply moisturize the hands often due to skin issues, the lotion, cream, or oil on my hand often get in the way of fountain pen inks! The inks would skip or feather on paper, and it can be distracting or frustrating sometimes.

    So, in this post I’ll be listing down what inks and papers I found to be least sensitive, or least affected by hand cream or hand oil when writing with fountain pen ink. Just note that what works for me may or may not apply to you because of varying factors, including the type of lotion, cream, or oil we’re dealing with.

    Fountain pen ink that hold up well against hand oils:

    List of specific inks:

    • Platinum Carbon Black
      It doesn’t budge as I write on lotion-smeared MD Paper. Based on experience with this ink in a LAMY Safari EF, there’s no skipping or feathering at all. Currently the most reliable fountain pen ink to me when writing with lotiony hands!
    • Sailor Seiboku
      When writing with a Sailor HighAce Neo F or a Sailor Profit Jr. F on a sheet of MD paper, there was barely noticeable skipping of ink, with no observed feathering.
    • Pilot Iroshizuku inks:
      I have observed minimal feathering with no skipping on MD paper as I wrote with these specific inks:
      • Tsuki Yo
      • Kon Peki
      • Yama Guri
      • Yama Budo

    Fountain pen-friendly paper that I find “less sensitive” to hand oils:

    • Rhodia
    • Traveler’s Notebook refills
      • Dot Grid
      • Lightweight Paper

    Comparison notes:

    • Rhodia paper vs MD Paper “Cream”
      Rhodia paper seems to be less susceptible to skipping inks and feathering inks, compared to the MD Paper. Rhodia absorbs the ink I wrote with faster, unlike in MD Paper where the ink seems to sit there longer before it dries.
    • Traveler’s Notebook refill papers
      • 013 MD Paper Cream – The surface of this paper is smooth to the touch, as if it is finished with a coating. It takes longer for inks to dry here, from my experience, compared to the “Dot Grid” MD Paper and Lightweight Paper.
      • 014 Dot Grid  – They call the paper used in here an “MD Paper”, and from my understanding, the only difference should be the color (this is white) plus the dot grids, of course. But to me, the “Dot Grid” MD Paper is rougher to the touch, and absorbs my fountain pen inks better than the “MD Paper Cream” one.
      • 005 Lightweight Paper – Like the Dot Grid notebook’s paper, this one absorbs ink better than MD Paper Cream. However, I feel that it absorbs a bit too much ink that there’s tendency to feather. I like sticking to extra fine nibs when writing or drawing on this lightweight paper. Although not mentioned in the official website, people say that the paper in “Lightweight Paper” inserts of Traveler’s Notebooks is Tomoe River paper.

    My go-to paper is still MD Paper Cream despite not being very tolerant of hand oils. 😅 I just really like how easy it is on the eyes to gaze at that cream-colored paper, during moments when I ponder what I should write on my journal. To avoid frustration from skipping or feathering inks caused by my inkzema* hands while using MD Paper Cream notebooks, I simply reach for the inks I listed under “Fountain pen ink that hold up well against hand oils”, or use a pencil board for my hand to rest on while writing. Pencil boards are also known as shitajiki, underlay, or writing mat.

    Bonus: Non-fountain pens whose inks don’t seem affected by hand oils

    When I don’t want to bother with fountain pens, often when problem-solving at work, I reach out for:

    • Zebra Sarasa 0.5 in black

    * Ink on hands + eczema on hands = inkzema on hands, so now I use inkzemic instead of eczemic. Makes no sense? That’s fine, pay me no mind. 😌

  • XCEL Driving School review & rates

    After sorting things out, I finally enrolled myself to a PDC (practical driving course) at XCEL Driving School.

    I chose to take the PDC at XCEL Driving School in Makati City because the location is accessible from my place, the branch representative Ms. Alma is easy to communicate with, and I already trust them because I did my TDC (Theoretical Driving Course) with them in the past.

    I only took an 8-hour beginner course and thought I’d just add more hours as needed. Automatic car was my choice because I think that my differently-wired brain won’t be able to do its best driving a manual one. I took 2-hour driving sessions with XCEL for 4 days. After that, I chose to practice with my partner instead as he gave me more liberty to sharpen my driving skills in ways I learn best.

    XCEL Driving School review

    I will be sharing short information on each 2-hour driving session with XCEL. I will probably miss a lot of details, but I’ll try to add more later once I am able to go through my notes (I wrote down what I learn after each session, lest I forget about them).

    Day 1 of XCEL Driving School PDC Session:

    The first day involved familiarization with car parts that you’ll have to be concerned about while driving, such as tire-check, side and rear view mirror check, and also getting the feel of car controls while you’re in the driver’s seat. The most important tip from the instructor was to:

    Keep your eyes focused far ahead on the road. This gives you more time to anticipate and react to what’s happening up ahead, improving your ability to respond safely.

    Day 2 of XCEL Driving School PDC Session:

    Based on my experience at XCEL’s 2nd-4th hours of driving lessons, I think the focus at this level was properly aligning one’s vehicle on the road and getting a better feel for controlling the vehicle. For me, the trick to alignment is — again, focus your eyes far ahead on the road, and do quick glances at side mirrors to see if your vehicle’s aligning to the road’s lines/markings.

    I liked how “chill” this session’s instructor was. He mostly let me try things my way, although honestly I didn’t learn a lot of new things that day. Maybe that was the intention of XCEL driving school for this session — let the student be more confident behind the steering wheel, and then fine-tune the driving skills with a detail-oriented instructor on the next session! 😮

    Day 3 of XCEL Driving School PDC Session:

    The instructor for XCEL’s 5th-6ths hours was, as I mentioned earlier, detail-oriented, and also kinda strict! It was uncomfortable how he sort of micro-managed my movements, but I’m not really complaining because I learned a lot from this person (and I am the oddball who has difficulty in learning things the “normal” way).

    There were soooo many things that this session’s instructor taught me. From adjustment of the seat to make it more comfortable, various driving maneuvers, why going slow is best, etc.

    My favorite tip from this session: Before making a turn, focus on where you want to go. Turn your head and direct your gaze toward that part of the road, looking through the side window if necessary. Keep turning the vehicle until the road you’re focused on comes into view through the front windshield.

    Day 4 of XCEL Driving School PDC Session:

    My 7th to 8th hours of driving lessons with XCEL was mostly fine-tuning of driving skills. The instructor aimed to observe how well I was able to drive, and to correct each mistake that he noticed.

    The instructor helped me practice the driving skill I sucked at the most — how much to turn back the steering wheel after making a turn. We drove countless times around blocks in the area until I got a better feel for it.

    I was advised to wait for XCEL Driving School Makati’s representative to contact me regarding biometrics capture, and was encouraged to practice as often as I can. I finished and passed my 8-hour beginner driving course!

    XCEL Driving School rates (Makati branch)

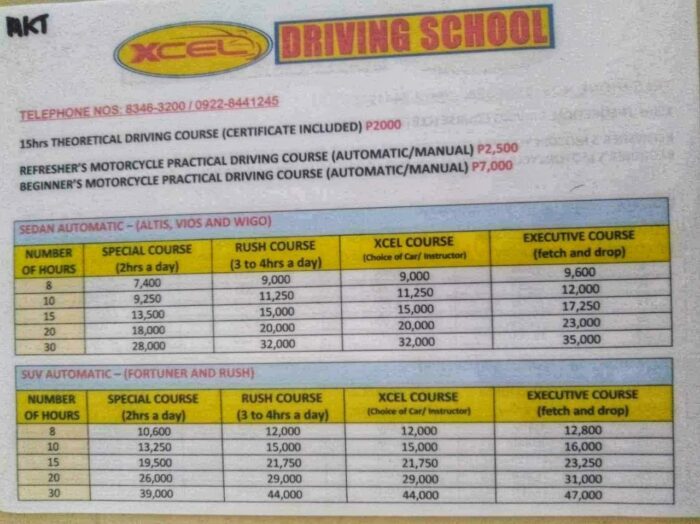
    See below images for prices of PDC at XCEL Makati branch. These were the rates as of May 2024.

    xcel driving school rates fees price review makati

    What’s next?

    I’ve been practicing during my days off work, when I am able to. My partner says that I have improved significantly and that it’s likely that I will pass the LTO driving exam. Although I am not yet sure when I will give it a go, since that will require me to be on leave from work, and from what I hear, many applicants take a whole day to get through the entire process at LTO. 😫 The recent work days have been crazy! Well, maybe not “crazy” for other people, but I take it really seriously (maybe *too* seriously) so I have been spending a little more time and exerting extra effort. 💪🤖

    Questions and Answers:

    • Can student drivers practice in their own personal time without an accredited instructor?
      • To be allowed to drive, the student must:
        • Bring their LTO Student Permit including the Official Receipt as well as
        • Be accompanied by a licensed professional or non-professional driver (XCEL instructors themselves told me that my partner, who has a driver’s license, is allowed to be my companion while I practice as a student driver).