Tag: health

  • POI Physical Therapy for Degenerative Disc Disease: Review, Sessions, Costs at Philippine Orthopedic Institute Makati

    My orthopedic doctor recently diagnosed me with Degenerative Disc Disease (DDD) affecting my lower back, specifically the L1-L5 vertebrae, and referred me to physical therapy at the Philippine Orthopedic Institute (POI) in Makati City, located on Dela Rosa Street. It’s a convenient location as it’s close to Makati Medical Center.

    The intense pain in my lower back started and ended last month. I could barely walk due to the lower back and hip pains, tightness, and spasms. I managed to avoid the emergency room thanks to some resourcefulness — Yoga by Joelle’s video for “herniated disc pain” provided significant relief every time I used it.

    Before you proceed, please note that the following information may have some inaccuracies as I’m relying on my memory. Even though you and I may both have DDD, our treatments could differ depending on our individual needs and conditions.

    First Physical Therapy Session for DDD at POI in Makati

    Reluctantly, I attended my first session at the Philippine Orthopedic Institute (POI) today. During the initial session, the therapist conducted a quick interview about my lower back pain, asking when it started, whether I had experienced any accidents, and the intensity of the pain.

    By this time, the pain had already decreased significantly compared to last month, only flaring up when I neglected my posture during my desk job.

    Here’s what was done during the physical therapy session:

    Part 1 – Treatments

    • I was asked to change into a patient’s gown, remove my footwear, and lay on my belly.
    • Application of a heat pack on the painful area, with electrodes
      • This treatment lasted 15 minutes, supported by two pillows.
      • The sensation was more relaxing than painful.
      • I requested to turn on the fan because the room was a little too warm, especially with the heat from this treatment.
    • Ultrasound on the painful area
      • Almost fell asleep at this point; it felt like a very gentle back massage (UwU).
    • Shockwave therapy
      • The therapist warned me it would be painful, but it was supposed to relax my back muscles. The gun-shaped device did sound like it was going to inflict serious pain! lol.
      • Surprisingly, it wasn’t painful for me. I found it relaxing too, like a massage gun!

    Part 2 – Stretches

    • Inner thigh stretch, performed three times on each leg
      • The therapist moved my thigh close to my chest, bent my knee, and let the sole of my foot press against their torso, then applied pressure by leaning towards me.
      • It was an awkward stretch and very challenging because it took a lot of effort to keep gas from escaping… (⸝⸝⸝- α΄— -⸝⸝⸝ ; )
    • Hamstring stretch, performed three times on each leg
      • The therapist lifted my leg and straightened it, with the sole of my foot facing the ceiling.
    • Glutes stretch (figure four), performed three times on each leg
      • The therapist asked me to assume a figure 4 position, then pressed my thighs close to my chest until I felt my glute muscles stretch.

    Part 3 – Warm-up and Strengthening Exercises

    • Core muscle warm-up x 10
      • The therapist asked me to place my hands underneath my lower back (palms facing the bed), then activate the abdominal muscles and keep them engaged for 10 seconds — I timed this with my exhales.
      • During my inhales, she had me relax the abdominal muscles.
    • Bridges x 10
    • Modified sit-ups x 10
      • Lying flat on my back with my knees bent, I performed small sit-ups, lifting only the upper back, with my hands reaching out to my knees.
    • Cat-cows, holding each pose for a count of six, repeated 10 times
      • Cat pose: I focused on drawing my navel toward my spine (I had to be careful with this because if not done properly, I felt like the bending motion could worsen my disc issues) — I timed this movement with my exhales, like in yoga.
      • Cow pose: I focused on lowering my belly, lifting my tailbone, and stretching my head upward — I timed this movement with my inhales.
      • From this point onward, my therapist supported my waist/hips area because my scoliosis (mostly lumbar) was getting in the way.
    • Bird-dogs, repeated 10 times (my scoliosis made this challenging, but the therapist helped me balance my hips).
    • Supermans, repeated 10 times
    • Press-ups, holding the stretch upward for a count of 15, repeated 3 times
      • This is similar to Pilates “swan” pose.

    My wrists hurt from the exercises done in the all-fours position. I think it would have been a bit more stable and comfortable for my sensitive wrists if I had performed them on a hard surface, like an exercise mat on the floor. POI uses a bed wrapped in a plastic cover (which smelled nice, likely evidence of regular disinfection). I’ll bring up my concern to the therapist next time.

    Although I’m familiar with all the exercises the therapist asked me to do, I think it’s much better to do them with a therapist’s guidance because they can correct any incorrect posture or positioning.

    The therapist also corrected me when I tried to get out of bed with a swift sit-up movement. (°ー°〃) They taught me that while lying on my back, I should bend my knees and roll sideways to get out of bed.

    Second Physical Therapy Session at Philippine Orthopedic Institute (Makati)

    During my second lumbar back pain therapy at POI, the same therapist led the session, but most of it was supervised by an intern. I wasn’t asked to change into a patient’s gown this time and was instructed to lay on my belly immediately. They had a hard time applying the hot compress on my lower back because of my outfit, so I asked if I could change into my PT clothes to make it easier.

    The intern performed the same treatments as before, and she did well:

    • Heat pack: Application of a heat pack on the painful area with electrodes for 15 minutes, supported by one pillow this time.
    • Ultrasound
    • Shockwave

    Then, the main therapist returned to the room and did the same stretches on me while I laid on my back:

    • Inner thigh stretch: Performed three times on each leg.
    • Hamstring stretch: Performed three times on each leg.
    • Glutes stretch (figure four): Performed three times on each leg.

    For the warm-up and strength exercises, the intern took over. Unfortunately, she barely checked my posture and positioning as I did the exercises, so I felt it wasn’t a very productive session. We did the following:

    • Pelvic tilt (Core muscle warm-up): x 10.
    • Bridges: x 10.
    • Modified sit-ups: x 10.
    • Cat-cows: Count to six per pose, repeated 10 times.
    • Supermans: Repeated 10 times.
    • Press-ups: Count to 15 while holding the stretch upwards, repeated 3 times.

    However, there were no bird-dogs this time. The intern said it wasn’t part of the set exercises for me that day, but I wasn’t sure why.

    One thing I did learn from my therapist on this day was that with a meniscal tear in the knee, I should avoid fully bending the knee and try to keep it at a 45-degree angle at most.

    Third Physical Therapy Session at POI Makati for Degenerative Disc Disease (L1-L5)

    A new therapist was assigned to me this time. Her name is Nam (not sure how it’s spelled) and I really appreciate her. She was very professional in the way she communicated and even in the way she was dressed. I felt that every step of the way during my 3rd DDD therapy session at POI, Ms. Nam ensured that I was performing my exercises correctly by visually examining my posture/position and by palpating (any more accurate word?) my core muscles to check if they’re contracting as expected during my movements.

    Part 1 – Treatments

    Also not asked to change into patient’s gown on this 3rd session. So I don’t know why it was done during the first. Anyway, I had already changed into my physical therapy attire before I checked in to POI’s reception area.

    Same old initial treatments were performed:

    • Heat pack: With electrodes for 15 minutes.
    • Ultrasound
    • Shockwave

    Some things I learned from Ms. Nam’s related to heat/cold treatment:

    • Cold pack treatment: Best for freshly-injured muscles to lower inflammation, e.g., right after weighted exercises.
    • Heat pack: Best after about 24 hours if I did weighted exercises and had DOMS.
    • Heat pack usage: Since I only have a small heat pack at home, Ms. Nam suggested using it on my lower back one side at a time so that it remains effective.
    • Heating pad: The heating pad that POI uses requires boiling water.

    Part 2 – Stretches

    Nothing new in this part of the session, except that I observed how precise Ms. Nam was in the way she performed these stretches. She’s amazing!

    • Inner thigh stretch: Performed three times on each leg.
    • Hamstring stretch: Performed three times on each leg.
    • Glutes stretch (figure four): Performed three times on each leg.

    Part 3 – Warm-up and Exercises for Strength

    I didn’t expect today’s therapist to impress me even further. She was detail-oriented and I was really thankful for that. The exercises felt waaaaay more effective when done correctly.

    • Pelvic tilt (Core muscle warm-up): x 10
      • Therapist’s correction(s): Do not lift your butt!
    • Bridges: x 10
      • Therapist’s tip: Contract your glutes and core as you lift your body up.
    • Modified sit-ups: x 10
      • Therapist’s correction(s): Your shoulders and neck look so tense; Contract your ab muscles and let them do the work for you in this exercise.
    • Toe taps: x 10 — Added by Ms. Nam today.
    • Dead bug exercise: x 10 — Added by Ms. Nam today
      • Therapist’s correction(s): Straighten the leg that you are lowering, but without touching the bed (my muscles hurt more that way but I felt it was the right kind of pain — the kind that will build muscles!).
    • Cat-cows: Count to six per pose, repeated 10 times
      • Therapist’s correction(s): The therapist realigned my hips whenever they moved the wrong way (thanks to scoliosis grrr).
    • Bird-dogs: Added back today
      • Therapist’s correction(s): Ms. Nam patiently corrected my hip positions repeatedly; the left side of my core feels weak. So when I raise my right hand and left leg, I always fell off balance. Towards the end I tried my best to contract the weak core muscles further and finally got a “very good” from therapist-sensei.
    • Supermans: Repeated 10 times.
    • Press-ups: Count to 20 while holding the stretch upwards, repeated 3 times (Yes, it’s 20 instead of 10 counts today)
      • Therapist’s comment: This is just for stretching the core.

    Part 4 – Traction Machine

    I was surprised to find out that there was a door by the waiting area of POI Makati Therapy area. This room contained two traction machines.

    Ms. Nam first measured my weight to determine how much “lower back stretching” the traction machine should perform on me that day. This machine can help decompress the tightness in the lower back.

    They strapped my hips, and then my upper torso onto the machine. The traction device was stretched and then released in repeated cycles of about 10 minutes.

    Fourth Physical Therapy Session at POI Makati for Degenerative Disc Disease (L1-L5)

    I visited Doc Carlo Borbon, my orthopedic doctor, before my 4th session. I told him that I’ve only been able to attend physical therapy sessions once a week. His face expressed disappointment, until he heard me say that I do the exercises almost everyday at home, and that I feel that my significantly strengthened core muscles have been protecting my lower back as I carry out the same daily activities that used to trigger my lower back spasms. He said that it’s a very good progress, and that I may conclude my series of PT sessions by only attending 3 more.

    The 4th session was more or less the same, but Ms. Nam added/modified a little bit:

    • Added a new exercise: Push both knees to chest, while pushing them away with your hands
      • Create resistance between thighs/knees and hands/arms
      • Feel it activate the core muscles
      • It was inserted before toe-taps, if I remember the sequence correctly
      • Done for 8-10 counts each repetition; Repeat 10 times, if I remember correctly!
    • Modified the bird-dog exercise: Do it on one side 10 times, then on the other side again 10 times. Finish it with the classic alternating sides, I think only 5 times for this one.
      • Done because my lumbar scoliosis was making one side more difficult
    • Configured the traction machine with a heavier weight.

    I learned a few things during that session:

    • Of all DDD physical therapy devices used on me, the TENS device is the most recommended for patients to purchase. Ms. Nam said that if I purchase one, I can bring it to my PT session and they can teach me the proper configuration that should be applied to my condition.
    • The knee-to-chest stretching at the beginning stretches superficial glute muscles, while the figure-4 glutes stretch is for the deeper glute muscles.
    • The superman stretch are mainly for lower back muscle strength, but it also works the glutes

    Fifth Physical Therapy Session at POI Makati for Degenerative Disc Disease (L1-L5)

    More or less the same as the third physical therapy at POI. But this time I opted out of the traction machine because the total cost exceeds the budget I get from HMO (Intellicare) per physical therapy session, and I cannot justify the extra cost as I don’t feel significant improvement from the traction machine.

    Sixth Physical Therapy Session at POI Makati for Degenerative Disc Disease (L1-L5)

    The 6th and last PT session at POI Makati was most tiring of them all. There was a seminar being held in the building that day, which the physical therapists attended in AM/PM batches to keep the ops rolling, according to Ms. Nam. Patients were fewer than usual that day. I also noticed that there was a new office at the ground floor — that will be for consults and bone scan procedure.

    On this therapy session we skipped the knee-to-chest stretching before the exercises. Ms Nam added 10 flutter kicks, 10 crossed flutter kicks, elbow planks, and several weighted exercises. I didn’t expect this and was really exhausted after the session.

    Exercises on the 6th (and last) POI physical therapy session for DDD:

    Part 1 – Stretching

    • Skipped: knee-to-chest on 10 counts, repeated 3 times before switching legs
    • Hamstring stretch
    • Figure 4

    Part 2 – exercises on your back

    • Pelvic tilt (Core muscle warm-up): x 10
      • Therapist’s comment: Do not lift your butt!
    • Bridges: x 10
      • Tip: Contract your glutes and core as you lift your body up.
    • Modified sit-ups: x 10
      • Tips: You’re doing it wrong if your shoulders and neck are so tense; Contract your ab muscles and let them do the work for you in this exercise.
    • Toe taps: x 10
      • Tip: tuck your belly button in a little bit towards your spine, for activating muscles that support in this movement
    • Dead bug exercise: x 10
      • Therapist’s correction(s): Straighten the leg that you are lowering, but without touching the bed (my muscles hurt more that way but I felt it was the right kind of pain — the kind that will build muscles!).
      • Tip: tuck belly button in too!
    • Flutter kicks x 10 — added in the last session
    • Crossed flutter kicks x 10 — added in the last session
      • Tips: Inhale as legs part, exhale as you cross them
    • Knee hugs for around 10 counts: x3 — added in the last session

    Part 3 – exercises on your belly

    • Plank on your elbow: x10 at count of 20 seconds each
      • Tip: Tuck belly button in to support core; don’t let core drop!
    • Cat-cows: Count to six per pose, repeated 10 times
      • Tip: pay attention to hips here, if you have lumbar scoliosis
    • Bird-dogs: x 10
      • Stabilize core and pay more attention to hips here to maintain balance; the lumbar scoliosis gets in the way.
    • Supermans: Repeated 10 times.
    • Press-ups: Count to 20 while holding the stretch upwards, repeated 3 times
      • This stretches the core and you should also feel it in your upper/middle back

    Part 4 – weighted exercises outside individual therapy rooms at POI

    • Carry 2.5KG dumbbell on each hand
      • Engage core; Imagine you’re trying to balance while holding grocery bags
      • From one end of the hallway to the other, do high-knee marches (Tip: Straighten leg whose foot is on the floor for balance)
      • Notes:
        • Nam said I can also use a heavy kettlebell held onto the chest at home but best if they’re two weights held like grocery bags on the side of the body; sadly my dumbbells at home are mcuh lighter
        • Lost my balance as I held back my laughter upon eye contact with my partner lol
    • Hold a 6KG kettlebell in one hand with the other arm held across the shoulder
      • Keeping core engaged, walk normally from one end of the hall to the other
      • Repeat with the other hand/arm
      • Notes:
        • It was like an obstacle course too as I had to avoid physical therapist and patients I came across in the hallway xD
        • It seemed to me that the POI Makati therapist were chummy among one another; their work culture must be really nice!
    • Hold 6KG kettlebell on one hand like 1 heavy grocery bag, with other arm held across the shoulder again
      • Perform side crunches, leaning the torso sideways towards the arm with a kettlebell
      • Ensure that you feel core muscles contract here (lean sideways starting from above belly button only, but make sure you lean far enough to feel the ab muscles working)

    Some advice from my physical therapist Nam:

    • Can opt to use heat pad only on sore days
    • Aim for 3 times a week physical therapy exercise to maintain my spine health

    Aside from maintenance exercises, one rule I set upon myself is to maintain the “C” curve of my lumbar spine as much as possible. So far it’s an easy and effective way of preventing the muscle spasm/sprain that I suffered from for so many times.

    After the 6th and last POI Makati physical therapy session, I went to my orthopedic doctor Dr Carlo Borbon for clearance. He did the same checks that he performed before sending me for therapy: Bend forward, bend backward, bend sideways to both sides… He also examined my lower back muscles, and commented that they felt less tense than before!

    Physical Therapy Cost/Fees at POI (Phil. Orthopedic Institute) – Dela Rosa St., Makati City:

    • My physical therapy session for lower back pain (degenerative disc disease L1-L5) costed 2400 Philippine Pesos, including usage of the traction machine. I found out because the POI Therapy Department texted me about exceeding the 1500-peso limit that HMO (Intellicare) set on my LOA/RCS.
    • In initial sessions that didn’t involve a traction machine was probably 1500 pesos or less because we had no problem despite the 1500-pesos limit on the cost covered by Intellicare.

    Cost update as of Sept. 15, 2024: They will increase physical therapy service fees on October 1, 2024.

    Tags: Physical Therapy, Lumbar Back Pain, POI Makati, Degenerative Disc Disease, Heat Pack, Ultrasound, Shockwave, Inner Thigh Stretch, Hamstring Stretch, Glutes Stretch, Pelvic Tilt, Bridges, Modified Sit-Ups, Cat-Cows, Supermans, Press-Ups, Bird-Dogs, Traction Machine, Core Exercises, Meniscal Tear
  • Nasolaryngoscopy experience at Makati Med ENT Center

    I went to Makati Medical Center the other day for a “flexible nasolaryngoscopy” procedure at the ENT Center. This was to examine my throat and see what’s going on there.

    A nurse sprayed topical anesthesia into my nostrils. Despite the numbness in my soft palate area, the insertion of the scope still felt quite uncomfortable, almost painful, but thankfully it did not last long.

    The entire procedure lasted only 10 minutes and we were able to see what’s wrong with my throat.

    Thanks, nurse Janelle and Doc King CedeΓ±o!

  • ECG at Makati Med Heart Station

    I just came home from Makati Med Heart Station, where I had my very first ECG test.

    Several years ago, I started feeling my heart “shaking” at random times, regardless if I was stressed or at rest, but usually lasting for only 1 second and it wasn’t painful so I didn’t worry about it. By “shaking”, I mean that my heart beats louder and faster than usual.

    This year I started drinking more coffee because I’ve been quite busy, and since then, the heart-shaking became more frequent! There was even a time when it lasted almost 3 seconds and it scared the hell out of me. It was still pain-free, but I was scared.

    My family medicine doctor wrote me a referral to get a 12-Lead ECG, to rule out “cardiac dysrhythmia”, which means that there is a irregular heartbeat.

    Preparation for ECG at Makati Med Heart Station

    I brought the following items:

    Valid ID
    ECG Referral (can be a soft copy; ask for their email address)
    HMO Card, if any
    HMO Loa, if any
    Vaccination card, just in case

    What to wear for your ECG at Makati Med Heart Station

    For ladies, if you’d like to feel as comfortable as possible, you may want to wear a bra that provides good coverage, and a button-up top so that you simply have to unbutton it during the procedure. I was told that all staff who perform ECG at Makati Med Heart Station are female, so don’t worry so much about it.

    And for the gentlemen, if not taking off your shirt is the most comfortable for you, I also suggest that you wear a button-up shirt.

    What was it like getting an ECG done at Makati Med Heart Station?

    First, get a number from the kiosk inside Makati Med Heart Station, near the entrance. The waiting line to the reception counter at Makati Med Heart Station was very slow, and the room was so hot in the afternoon. But there’s a cold water dispenser there that may help you feel refreshed. The wait was a bit stressful nonetheless, and I hope it doesn’t affect the ECGs of the patients.

    Once your number is called in the counter, things will start to get faster. A short moment after talking to the lady in the reception counter, my name was called by the lady who was about to perform ECG on me.

    I laid upright in bed as the lady attached the electrodes (correct me if that’s not the right term!) to my legs, arms, and chest. Then she ran a machine for… I think not more than a minute. I hope that it’s enough to catch an abnormal heart rhythm. I prefer not to do the 24-hour monitor because I have pressure urticaria, and I think it’s gonna make me itch a lot for 24 hours! But if it comes to that, then I’ll just have to woman up to get it over with.

    Can you get the ECG result online from Makati Med?

    Results for ECG and 24-Hr Holter Monitor ​are not yet available online, so you’ll have to claim the results at Makati Med Heart Station. Bring your official receipt with you.

    Processing of results is 24 hours, according to the lady who did my ECG. I am confused though, because on the Makati Med website they say it should take 2 business days. Anyway, I won’t be able to go there within the next 2 days so… yeah.

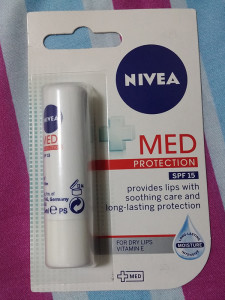
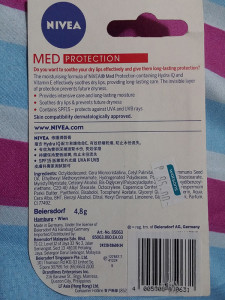
  • Nivea Med Protection lip balm review: for painful chapped lips

    Nivea Med Protection lip balm review: for painful chapped lips

    Last year around December, I began having chronic chapping of my upper lip. I thought maybe it was simply because of the cold season. It’s still cooler than usual in the Philippines in January and February, and I still had chapping, peeling and stinging feeling on my upper lip. I just tried to ignore it, applying lip balm as often as I could, hoping that it would heal and be gone with the dry season.

    It’s summer and I still got red, irritated, peeling upper lip. It was as if I applied lip liner on my upper lip, without coating it with lipstick, plus there was visible peeling. How unsightly. What’s worse was that the chapping was becoming painful, even worse compared to what I had in dry season. It was painful to open my mouth to eat, or to even smile! πŸ™ My upper lip crack when it’s stretched.

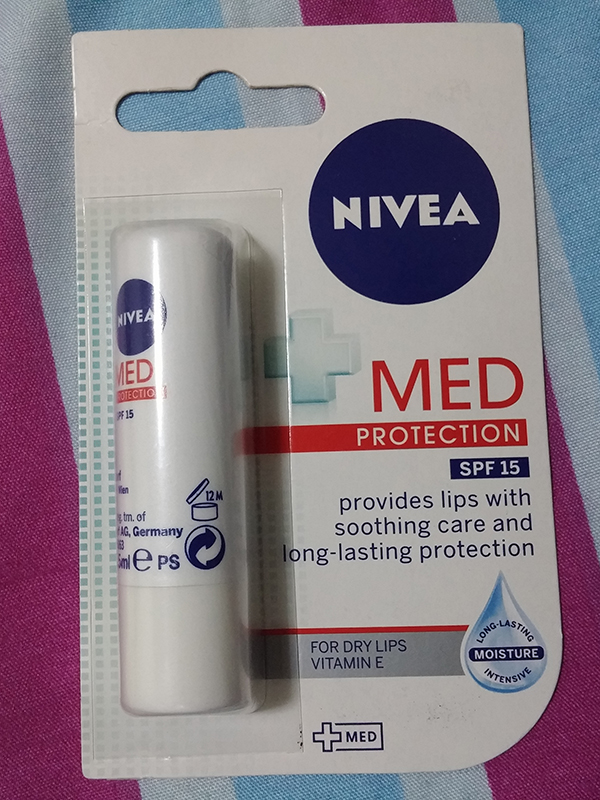
    I asked an office friend if she knows of any remedy for it, and she lent me her lip balm – Nivea Med Protection.

    20160406_093745

    I was embarrassed to use it at first, like, “is it okay for me to use yours?” I mean, a lip balm is a little bit too personal to share sometimes, right? xD But since I was already getting frustrated with the look and pain on my lip, and my kind friend seemed really okay with it since she saw how miserable the state of my lip was… I used the lip balm.

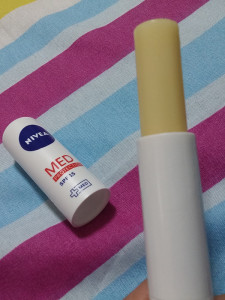
    It was like a magic lip balm!

    It glided on smoothly on my lips — the texture was buttery smooth, while the scent was very subtle but smelled so nice!

    Nivea Med Protection lip balm: immediate effect on chapped lips

    My upper lip was in a bad state that morning. Like I said, it looked like I lined my upper lip with red lip liner, and the peeling was visible. Nivea Med Protection did not conceal the redness, but it did make the peeling much less visible.

    It hurt my irritated, cracking lips when I smile… but right after applying Nivea Med Protection, it felt better. Not completely healed right away after applying, but really better! πŸ˜€

    Effect of Nivea Med Protection lip balm after several hours on chapped lips

    I applied the lip balm on my lips several times that day since morning. Around 5PM I felt that it’s really starting to heal. I passed by a Watson’s section in SM before going home and I bought my own Nivea Med Protection lip balm.

    20160406_193508

    One Nivea Med Protection lip balm costs 95 pesos.

    20160406_193444

    In the evening, around 8 PM, I felt as if my upper lip never got irritated during the day! I could finally smile without feeling my lip cracking. πŸ˜€ It still seemed a little bit red, and hurt a bit when I apply pressure, but felt perfectly fine otherwise.

    20160406_193814

    I used Nivea Med Protection lip balm everyday since then and the chronic chapping of my upper lip has not come back yet. Yay for me! Well, it still does peel a little bit everyday… which I think has been what’s “normal” for me for years. But that painful cracking lip condition is the one that hasn’t come back yet.

    By the way, I also bought Nivea Cream (moisturizer), the one in the blue tin container. I use it to moisturize my face, legs and feet because I have dry skin too in those areas. I also use it on my lips when I feel like subbing it for the lip balm… and it works well too! I’m starting to trust Nivea as a brand. At least for moisturizing the skin. πŸ˜‰

    So yes, if you have badly chapped lips, please do try Nivea Med Protection! It will help you. It’s like a miracle lip balm to me. πŸ˜†

    Another piece of advice: avoid using really old lip balm, because they may cause bacterial infection. I just read this somewhere on the web. ^_^

    // UPDATE, 2016-04-13: Again, I’ve been getting mildly irritated upper lip from time to time, with redness lining it. But as long as I keep applying Nivea Med Protection on my lips, it keeps the irritation from getting worse. I’m so glad I discovered such product!

  • Dry itchy sensitive skin patches – regimen for treatment

    Dry itchy sensitive skin patches – regimen for treatment

    My skin is oily in the facial area and in my back and chest. But from my legs to feet, I always thought they’re a bit dry.

    Since a few years ago, I would occasionally get small patches of skin in my legs or thighs. Those patches are bumpy (think goosebumps), slightly thickened, slightly discolored, and itchy. I think they went away on their own.

    And now, I have these patches on my two shins that have been here for months… or years! I usually ignore this type of skin condition cos they used to always just go away on their own, but the affected area is getting larger in time. I still don’t know why these don’t go away like the other itchy patches did.

    Dry itchy sensitive skin spots on my legs, described:

    Both of my legs have itchy spots. I can count about 3 in each leg, with the most noticeable by visual and by itch located at the shins. They’re spots that look like goosebumps and feel like goosebumps — but itchy. These spots are discolored, some light brown and some reddish light brown.

    Things I did before seeing a dermatologist for my dry itchy sensitive skin

    I initially applied “katialis” to the affected areas. Katialis contains sulfur, zinc oxide, resorcinol, and salicylic acid. It did not make the itchy spots go away and only made the skin peel. In the last couple of weeks, after a break from katialis, I tried “mopiko” whose active ingredients are menthol, methyl salicylat and camphor. The methol soothes the itch, but the spots did not go away either and they also peeled lightly.

    I tried to find an answer by Google-ing. Eczema was one of the results that popped up, but I read that eczema is caused by dry skin. My brain said, “but your skin is very oily. So it can’t be eczema.” Probably because in my entire life, I always focused on how to control the excess oil on my pimply face.

    A few days ago, I decided to finally visit a dermatologist. I would share what she recommended to me in this blog post, but please be advised that you should not use halciderm cream (halcinonide cream) without your doctor’s advice. I read that halcinonide cream can be very harmful to the skin (1) if used in the wrong areas, and (2) if used for more than 5 days. I repeat – do not use halcinonide cream without your doctor’s advice!

    Read more about halcinonide cream here: Halcinonide Topical

    Dermatologist visit:

    dove soap for dry itchy sensitive skin

    First of all, the dermatologist said that my problem is that I have very dry skin in the legs. She told me to bathe only once a day to avoid further drying of the skin. Use very mild soap that would keep your skin moisturized, such as Dove for sensitive skin. I told her I began using Dr. Kaufmann’s Sulfur Soap recently, but she told me to stop using it because it dries out the skin further. Whoops!

    Before I left her office, she gave me a list of foods to avoid:

    10734987_495362803939273_144010915_n

    Skin regimen to treat dry itchy sensitive skin patches

    Take note that I’m not promoting the brands of products mentioned here. They were the ones I got from the doctor, and the only variants I know of right now. πŸ™‚

    home treatment for dry itchy sensitive skin spots

    1. Every morning at 7am, take one Allercet tablet (Cetirizine).
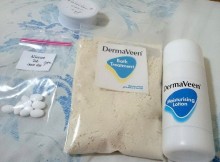
      Dermaveen Bath Treatment 5x 50g Sachets for dry itchy sensitive skin
    2. Make a paste of Dermaveen Bath Treatment (colloidal oatmeal). Mix 1 teaspoon of the powder with 2 teaspoons water to make a paste. Apply to the affected areas and leave on for 5 to 10 minutes before taking a bath. Apply this paste twice a day, but remember, the dry itchy sensitive skin areas must not be in contact with soap more than once a day.
    3. Rinse the mixture with water. Take a bath if you haven’t yet for the day. The dermatologist I visited did not specify that I should not soap the dry itchy patches of skin, but if I would soap it, I would choose to soap it with Dove for sensitive skin as she recommended.
    4. While the dry itchy sensitive skin patches of skin are still reddish, apply the prescribed cream (I think it’s called halciderm cream, which is made of halcinonide cream) to the affected areas. When the dry itchy patches of skin are no longer reddish, use moisturizing lotion instead. Do this twice a day.

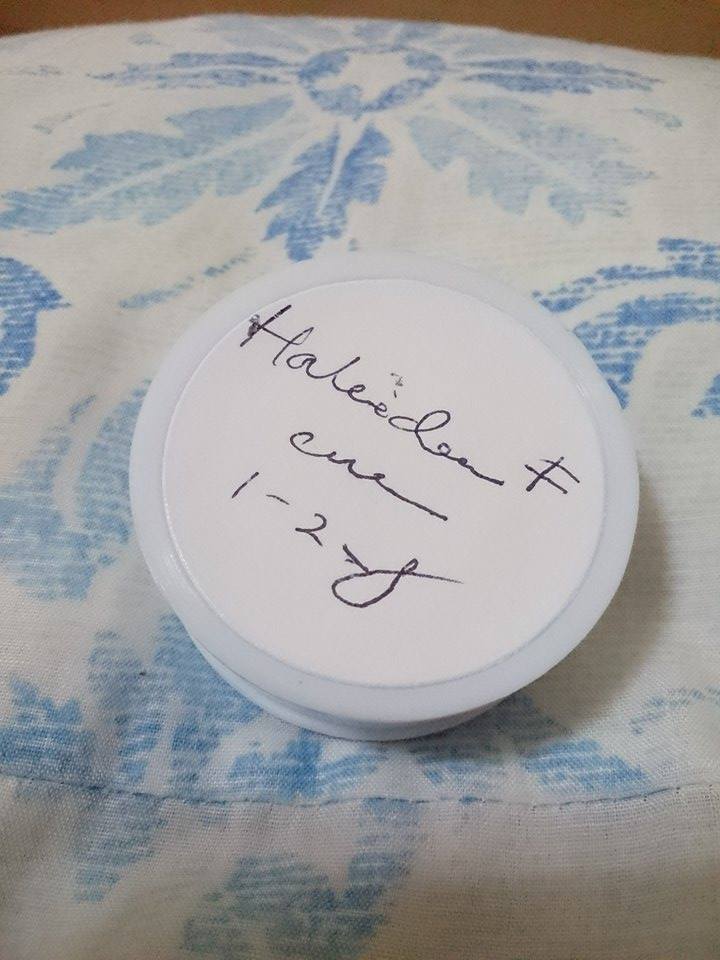
      I couldn’t understand the name of the prescribed cream as written by the dermatologist, but here’s a photo of the handwriting, which I think says “halciderm cream”:

      dry itchy sensitive skin cream

      The moisturizing lotion is Dermaveen moisturising lotion and according to the bottle photo, it contains “natural colloidal oatmeal”, “Avena sativa seed powder 2% w/w”.

      unbranded-dermaveen-moisturising-lotion-250ml for dry itchy sensitive skin

    One and a half day since I began following this regimen, and I’ve noticed slight improvement in the itchy, discolored patches of skin in my legs. I really hope this is not just psychological effect – you know what mindset, when you think it’s happening just because you were given something that’s supposed to make it happen? πŸ™‚

    When the dry itchy sensitive skin spots of my legs that look like goosebumps heal, I will do my best to moisturize my legs regularly. I will try to grind oatmeal into powder form too, and make the usual paste out of it to apply from time to time to my legs.

    (Fast forward to about 7 years and I developed chronic idiopathic urticaria, where the delayed/immediate pressure urticaria is driving me crazy.)

    (Fast forward 11 years after the original post — when I thought that pressure urticaria was the worst skin issue I would get at my age, I got diagnosed with “atopic dermatitis” as almost my entire body is covered in itchy bumps and plaques as I type this. Treatment’s expected to take several months for my skin to stabilize again, and this involves various lifestyle changes to maintain a healthy skin barrier — moisturizer, steroids on inflamed areas, avoiding harsh chemicals, reducing stress, etc. Dermatologist told me it’s a lifelong skin issue that I’ll have to manage. Sigh. Shrug.)

  • Contact lens for Sept. 2014 to 2015, affordable multipurpose solution with free case, and travel size multipurpose solution

    Contact lens for Sept. 2014 to 2015, affordable multipurpose solution with free case, and travel size multipurpose solution

    As a person with myopia (nearsightedness) who never feels comfortable with eyeglasses, I resort to contact lenses. I’m really glad contact lenses were invented. Without contact lenses, I would always have headaches from eyeglasses even if the lenses’ grades are updated.

    Last Saturday, my mother and I went to Paterno St., Quiapo. Goals were to get me a new pair of contact lenses, buy huge bottles of multipurpose contact lens solution with free contact lens case, and buy travel size multipurpose solutions for an upcoming flight with colleagues to Rootcon 8 in Cebu.

    Vista Prima Optical in Paterno Street for Contact Lenses

    Our feet took us to Vista Prima Optical. See the map:

    If you know that you should look for a colorful interior with greens and yellows, you won’t miss this optical shop. This was where I bought my 2013 to 2014 pair of contacts. Their contact lens price and quality were not bad, the shop is not far from my house, waiting time is short, and the staffs are accomodating and are all Pinays… so I had no reason not to come back, right? xD Chinatown/Binondo is another not-so-far place from my house and there are optical shops there, but I’d rather go to Quiapo because the Chinese doctors in Binondo area make me feel uneasy. Think language barrier.

    Clear contact lens for extended wear (approximately 1 year of use) cost 1200 pesos. The brand they sell is New Look. The doctor first checked my eye grades with that apparatus where the patient leans forward and see a hot air balloon photo. xD I think it’s called an autorefractor. Then she proceeded with the other eye exam where she made me wear that heavy eyeglasses where she added and took away lenses from. Through these two test, the doctor would determine the best power that your contact lenses (even eyeglasses) need.

    The waiting time for the contact lens was only 30 minutes. Mom and I went to buy stuff from Isetann first to kill time. Vista Prima Optical is open until 6PM anyway. We ate at Phat Panda Fast Food at Bustos St. The “small” size servings of dishes were good for two people and cost only 100 pesos. We ordered mixed seafood with vegetables which was nice because it had oysters, fishes and squids. I like those. The other dish was sizzling beef. It’s like Chinese-style beef with buttery sauce and vegetables. It was so-so to me. We also ordered fried rice, and it was bad. The rice was so soggy and it was almost like eating paste. Service was bad. There were only three staffs walking around to serve – two ladies and one guard. And when I said service was bad, it’s about one of the waitresses. I asked her for service water when she took our order. I waited. But when every food was already served to us, the water was still not brought to us. So I asked the same waitress again for water, and she said “Sige wait lang po.” And so we waited again. But she never served us water. She just kept serving other tables and seemed to have no intention of getting back to us. Another table asked for hot tea, and she, the same waitress who wouldn’t bring us water, immediately served them hot tea. We asked the other waitress for water, and she gave us a pitcher right away. Geez! Was the waitress doing it on purpose? She shouldn’t, because there’s no reason for her to do so, since we were politely requesting stuff from her.

    After the irritating lunch at Phat Panda, we went back to Vista Prima Optical to claim my contact lenses.

    IMG_20140913_143052

    The New Look contact lenses came with a 60 ml bottle of Bescon Cliwell multipurpose solution and a free contact lens case. That small bottle gave me hope of finding a similar bottle that I could bring to a flight.

    They don’t have huge bottles of contact lens multipurpose solutions there that had free contact lens case, so I told my mom I’d check out other optical shops.

    All Comfort Formula multi-purpose contact lens solution and Lens Care brand supply problem

    I saw bottles of “All Comfort Formula” multi-purpose contact lens solution being displayed at “I Sight Optical Centre” so I walked in to buy some. We realized that it’s the same optical shop where my mom purchased eyeglasses last year. Each 500 ml bottle costs 220 pesos with free contact lens case. It’s a bit more expensive per ml compared to my usual multipurpose solution called Lens Care (95 pesos for about 350 ml bottle), but Lens Care has a supply problem lately.

    The reason why I wanted to look for multipurpose contact lens solution in Quiapo is because of Lens Care’s supply problem in Mercury Drug stores. Lens Care could be found in any Mercury Drug branch, until recently. I went to a branch in Sta. Cruz, in EDSA, in Binondo, and in Makati, and there was either the expensive Opti-Free brand or nothing.

    I Sight Optical Centre did not sell travel size bottles of contact lens solution. I saw that they had small Lens Care bottles but they were not for sale. They are for bundling with purchased contact lenses. They do sell contact lens cases for 25 pesos each though. I shall take note. πŸ™‚

    Travel size multipurpose contact lens solution bottles

    In the next few weeks, I’ll be on a flight bound for Cebu with office mates. We will be attending Rootcon 8. πŸ™‚ We are not checking in any luggage, and that gives me a problem with my contact lens solution. 3.4 oz or 100 ml is the maximum volume of liquid per container for carried bags in planes, while my solutions are 350 ml and above. My original plan was to drop by a Mercury Drug store upon landing, and buy contact lens solution there. But I felt that there would also be a supply problem of Lens Care in Cebu. 2 years ago, I was able to buy Lens Care in Cebu, but that was a time when supply was not a problem. So I thought, I would either buy that expensive Opti-Free solution (300+ pesos, IIRC) in Cebu or wear glasses for 4 days while walking around in unfamiliar places. It will be a very tough stay in Cebu if I only wear glasses. There would be constant head and eye pain, and difficulty in moving around.

    My mom didn’t want to check another optical shop. Getting tired, I think. But I told her I really need to find a small bottle of multipurpose solution similar to that freebie from Vista Prima.

    Another optical shop with an array of contact lens solution being displayed caught our attention. It was called “New SOS Optical Supply Co.” And they had the very same 60 ml bottle of Bescon Cliwell! πŸ˜€ Each bottle costs 65 pesos… or was it 60? xD Each bottle comes with free contact lens case too.

    Happiness. Thanks to Paterno St. in Quiapo

    IMG_20140913_142448

    For days these thoughts had bothered me – not having enough multipurpose contact lens solution in stock due to the supply problem of Lens Care in Mercury Drug stores, and the possibility of enduring discomfort from eyeglasses for days. But thanks to the numerous optical shops in Paterno St. that are doing business even on Saturdays, I don’t have to worry about those anymore! πŸ™‚

  • Nuat Thai Masangkay (Review, massage rates) – Swedish body massage experience at a branch better than Ermita’s

    Nuat Thai Masangkay (Review, massage rates) – Swedish body massage experience at a branch better than Ermita’s

    Here’s a Nuat Thai massage rates / price list that I took from Nuat Thai Masangkay branch, retrieved in July 2015:
    Nuat thai masangkay price list, July 2015

    In the past few weeks, me and my mom, accompanied by my BF, go to a hospital near Masangkay Street, Manila every Saturday. We were surprised to find that there’s a Nuat Thai branch in there because it’s currently not in the list of branches in the Nuat Thai website.

    You will find this Nuat Thai branch at 1211, Ground floor of Diamond Tower, Masangkay St., Sta. Cruz, Manila. If you are coming from Plaza Lorenzo Ruiz or Binondo Church, Nuat Thai Masangkay branch is located past Masangkay Street’s intersection with Recto Avenue. There is a Jollibee branch a bit after Nuat Thai Masangkay, almost facing it.

    You may be able ro reach them by calling 230-9971.

    Today, my BF wanted a massage for his aching back (says it’s caused by playing an arcade game, maimai) and so we went to Nuat Thai in Masangkay, a branch not so far from home. πŸ™‚

    We find that the Masangkay branch is better than Nuat Thai Ermita. The place has a relaxing smell of peppermint and the beds and room dividers are better. In terms of satisfaction in the massage itself, I liked the massage of the therapist in Nuat Thai Masangkay (Emma) as much as I liked the massage at Nuat Thai Ermita (Jenny).

    Like in Ermita branch, we were only charged 300 instead of 350 for Swedish body massage.
    (more…)

  • Nuat Thai, Ermita (Review) – Swedish massage experience with a good therapist

    Nuat Thai, Ermita (Review) – Swedish massage experience with a good therapist

    I had my best-so-far massage last Sunday at the Ermita branch of Nuat Thai. Β πŸ˜€ I don’t know if it’s Nuat Thai or the therapist I should give my praises to, but I was satisfied with the service. I call it my best-so-far massage because the pressure was just right in my thighs which my previous therapists hurt with their nails. ^_^

    (more…)

  • Chronic upper back pain and Mont Albo Massage Hut experience (Review)

    Chronic upper back pain and Mont Albo Massage Hut experience (Review)

    I have a chronic back pain, especially on the upper part. It’s been here for the past 3 years, beginning a few weeks before my graduation in May 2011. I have been trying to endure it, surviving mostly because of quick massages from my parents and my boyfriend.

    My first office work began in July 2013. The upper back pain, which is mostly around the shoulder blade muscles, persisted as expected. It even got worse last month in January 2014. I experienced severe pain in my right neck, down to my right shoulder, down to the shoulder blade muscles that have been painful for years. I found that standing up to walk is the only thing that helps me with this new kind of pain.

    I know I need to visit a doctor, maybe a specialist in orthopedics, but I haven’t found a female doc yet. I’m almost sure I need to take my top off during the examination, and I don’t want a male doctor to examine me without a shirt. So yeah, I’m… err, procrastinating about looking for a female ortho in an hospital or clinic that honors my health card. I decided I’ll just keep on taking breaks from sitting and getting massages to try to relieve myself of the pain.

    Today I visited Mont Albo in United Nations Avenue. My boyfriend and I went to the Padre Faura branch first, but it doesn’t exist in the building stated in their website. Outdated website info is so annoying, and we experience this a lot in movie scheds posted on websites.

    I’m not too pleased about Mont Albo in UN Avenue. But since we availed the Early Bird Promo, paying only 199 instead of 380, I’m not feeling so bad about it.

    Read on for a list of what I liked and didn’t like. I prefer writing lists over paragraphs because I kinda suck at the latter. ^_^

    (more…)

  • My story and tips for faster recovery from bad cough and cold

    My Story: Cough and Cold Love Me!

    Cough and cold are the illnesses I very frequently have to withstand since I was little. I think I have a weak lungs and/or immune system.

    It always starts off with a bad cold, which always leads to bad cough that causes so much pain in the chest because the phlegm is dry. I can’t remember any instance when I didn’t have a cough after a cold. Now that I’m older I think it’s caused by my postnasal drip (PND). The mucus in my nasal track is full of bacteria (cold virus), and thanks to PND My PND is caused by nasal allergy. I live in a neighborhood with air so polluted by vehicles, cigarettes and hardware stores.

    Having been a student staying inside the classroom the entire day, it’s always been embarrassing having the two mentioned illnesses especially the cough. I can recall how my itchy throat attacks me while in class, it’s extremely embarrassing because it’s not simply “noise” that I make – it’s “gross noise” as you will know judging by the sound that there’s thick phlegm stuck in my throat. Sorry I’m grossing you out. lol. So, I always had to suppress the coughing, covering my mouth with towel, praying that the attack would settle down very soon. If the teacher is nearby and not busy then I’m lucky because I can ask for permission to go out (yep we were required to do so in my high school).

    There was a project presentation during college when I had to keep out of the room for most of the period because of a cough attack. For many seconds I stood there in front of everyone, coughing, so I excused myself from the presentation. When the coughing calmed down, the presentation was almost over. Sounds kinda pathetic, I know.

    I also experienced this once or twice in an office, when I was an intern, but it was mostly nasal allergy gone bad since morning. I kept sneezing, sneezing, and sneezing. There was pain around my eyes, my head, and in my nasal track. There was also pain caused by embarrassment from office mates, who might have been so scared of being infected by my virus. BUT I thought that I actually had no virus since it was only a nasal allergy attack. My supervisor allowed me to go home early. When I was in the train on my way home, a technical problem arose. The train had stopped, and the air conditioner was off. Everyone was drenched in sweat, except ME. That’s when I confirmed I had fever. My illness that time turned out to be flu.

    Now that there’s no more school, and I work from home (lucky me!), there are no more cough-attack-in-the-classroom-slash-office nightmares. This doesn’t mean life is nightmare-free now. I am currently recovering from bad cough and cold, silently complaining about the pain my chest as I type.

    Tips for faster recovery from cough and cold

    I am not a doctor, but I’m giving advise which based on my own experience, help me recover faster from bad cough and cold.

    Get as much rest as you can

    When we are sick, the body fights off the illness. Let’s help our body do so by letting it rest as much as we can. I took two days off from my online work and was asleep most of the time, and it felt good. Try not to work out or do heavy exercise if you have bad cough or cold.

    Drink a lot of water

    Water helps our body cleanse itself. It will also help thin mucus caused by cough and cold.

    Nasal irrigation for nasal congestion

    I have a neti pot which I use to rinse my nasal passage with. Read more info on Neti Pots. It’s very effective for flushing out the bacteria in the nasal passage and for clearing congestion.

    …