Tag: documents

  • How to get marriage certificate in the Philippines online from PSA (NSO)

    How to get marriage certificate in the Philippines online from PSA (NSO)

    I requested a copy of my PSA (formerly NSO) Marriage Certificate last Monday and received it today, on a Saturday afternoon. I was required to present 1 valid ID and submit a photocopy of it to the person who delivered my PSA Marriage Certificate.

    Online request for PSA Marriage Certificate

    On August 19, Monday, I requested a copy of my PSA Marriage Certificate online. It’s for my application for Japan visa so that’s the info I entered before clicking the “Submit” button. Then, I filled out the Marriage Details, Name of Husband, and Maiden Name of Wife. I was also asked if I had any of the following done to my marriage certificate: correction of entry, annulment, court hearings, supplemental, or legal separation… I just clicked the “None” button. And then, I had to fill out information on “Who is requesting for this Marriage Certificate?” which should match the receiver’s name in the valid ID to be presented when the marriage certificate is delivered. Upon checkout for the online ordering of my PSA Marriage Certificate, I provided my contact info, delivery address, and number of copies of the certificate. This is the point where one could add the name of authorized representatives if the owner will not be the one to receive the marriage certificate. If you are opting for this, make sure to print the LOA (Letter of Authorization).

    Payment for my PSA Marriage Certificate online order

    You may pay online using a credit card or GCash, or by bank transfer. I chose to use GCash.

    Before sending payment for my marriage certificate, the status of my order was like this:

    August 19, 2019, 10:22 am
    Status
    Waiting for Payment Confirmation from Payment Provider

    After entering my GCash mobile number, I received an SMS asking for my GCash pin for confirmation.

    Few minutes later, the status of my order was updated into the following:

    August 19, 2019, 10:28 am

    Status

    Paid via GCash

    NSO Processing

    The next day, the status of my PSA marriage certificate online order became “processing”:

    August 20, 2019, 1:34 am
    Status
    Submitted to NSO for processing

    Delivery of the PSA Marriage Certificate

    5 days after my online order, I received the following SMS at 7:34 AM:

    Good morning. Please be advised that your requested PSA (NSO) document is for delivery anytime today.  Kindly prepare the recipient’s original & photocopy of the valid ID as well as the Letter of Authorization with original & photocopy of the valid ID from the person issuing the letter (if applicable).  For inquiries, pls call PSAHelpline at 737-1111. Thank you.

    I checked the status of my order online and saw the following:

    August 23, 2019, 4:01 pm
    Status
    For Delivery

    Oooh, so it was already marked as “for delivery” since the day before!

    At 12:59PM the delivery person texted me, asking me to prepare my valid ID and a photocopy of it. I was surprised that he asked me for a photocopy too. Previously, when I requested PSA (NSO) certificates, the delivery staff didn’t even check for valid IDs sometimes. I re-read the requirements at the PSA website and found this:

    What are the necessary requirements to be presented when receiving the documents upon delivery?


    If the person receiving the document is the owner or any of the Authorized persons(legal spouse, father, mother, son or daughter), he/she should present a signed valid original ID and submit a photocopy to the courier.


    If the receiving party is not one of the authorized persons, he/she needs to present the following:


    > Original signed letter of authorization (LOA) from the certificate owner/authorized persons (legal spouse, father, mother, son, or daughter)
    > To present a valid original ID of the owner/authorized persons (legal spouse, father, mother, son, or daughter)
    > A photocopy of the valid ID of the owner/authorized persons (legal spouse, father, mother, son, or daughter)
    > A photocopy of the valid ID of the authorized representative

    Oops! My bad, I didn’t check for the changes in the rules. I’m super lucky we have a printer with photocopy function at home. Otherwise, the marriage certificate would probably be re-delivered on another day because I don’t think we have any photocopy service near our home.

    The delivery person arrived at our place around 1:45PM. He asked me to sign a document for receipt. He told me that PSA became more strict recently so they now require a photocopy of the valid ID, aside from presenting the actual ID to the courier. I was told that a lot of clients have been frustrated about this new requirement, and that one of the delivery persons was slapped by a customer before because he could not provide a photocopy of a valid ID. Ouch! But PSA really won’t allow us to receive the certificate anymore without submitting a photocopy of the ID, for data security purposes.

  • Pre-employment requirements in the Philippines

    Pre-employment requirements in the Philippines

    For the past two years, I worked from home as web developer for a foreign company. And now,ย I am having office-based employment for the first time. I already did office-based work before for 7 months, but that was only internship, not yet employment.

    After some time and effort, I received some job offers from companies in various places – Makati, Ortigas, and Quezon City. I wanted to avoid Makati, dreading the wearisome commute that I already experienced during internship, but the offer I accepted is actually from the company at Makati. The position they offered me is what I think would best help build me up for my career goals, and so I decided to just overlook the difficulty in commute. After all, difficulty is part of life. ๐Ÿ™‚

    The pre-employments in the company where I’m about to work are as follows: (more…)

  • NBI Clearance Center – Application, Renewal, Price, Requirements 2017

    2017 Update: Do steps 1 and 2 online, and do steps 3 and 4 at an NBI Clearance branch of your choice!

    1. Fill out NBI Clearance application form online
    2. Pay for your NBI Clearance online
    3. Register your biometrics (photo, signature, thumb marks) for your NBI Clearance
    4. Claim your NBI Clearance at Release area

    I just applied for NBI Clearance renewal at Robinson’s Ermita this February 2017. The worst part is having to come back after 11 days because of a “hit”.


    2015 Update: part of NBI Clearance process can now be done online!

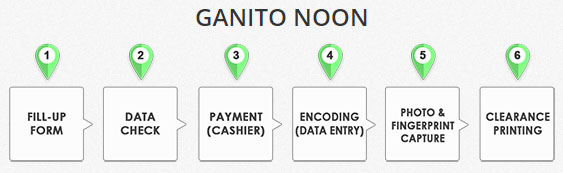
    The old NBI Clearance process was long and mostly manually done: fill-up form, data check, payment at cashier, data encoding, photo & fingerprint capture, and finally, the printing of NBI Clearance.

    nbi-clearance-process-before

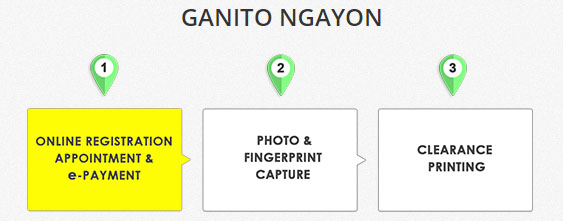
    But now, they compressed the processes in 3 steps:

    nbi-clearance-process-now

    The new process begins with Online registration, appointment, and e-payment, which we can do without visiting an NBI branch. For our Photo & fingerprint capture, we then go to an NBI branch. Printing of NBI Clearance is done after the photo and fingerprint capture.

    Much simpler process, right? If you have any trouble, you may contact with NBI Clearance staff via the following numbers during work hours (Monday to Friday, 9AM to 5PM). They were taken from NBI Clearance website on October 4, 2015:
    GLOBE NUMBERS: 09179999421 / 09179999418
    SMART NUMBERS: 09204129999 / 09995699964

    And just a comment – Wow, 8 hours lang sila? Ang convenient siguro ng 9 to 5 lang nasa office.

    How to register online for NBI Clearance in 2015?

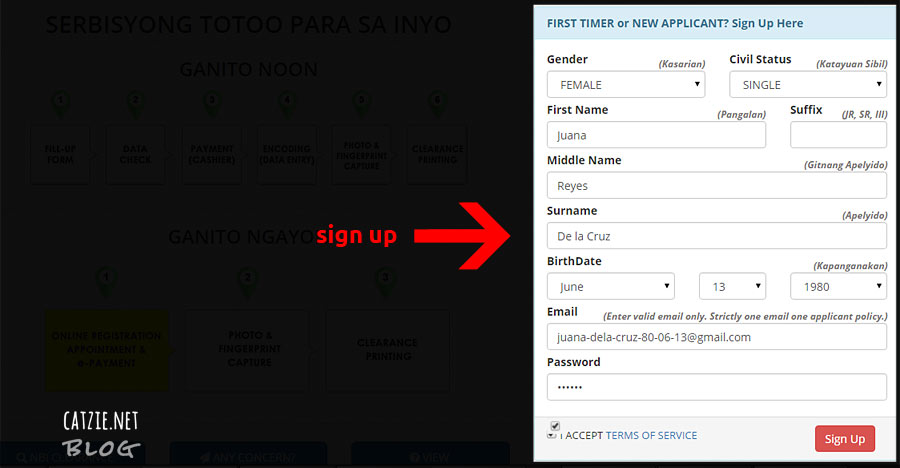
    First, you need to fill up the online form like in the screenshot below. Don’t forget to click the checkbox for “I ACCEPT TERMS OF SERVICE”.

    NBI Clearance  sign up form online
    NBI Clearance sign up form online. Click to enlarge

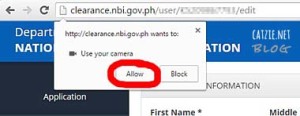
    After clicking the Sign Up button, you will be taken to a new page. In this page, you can set your picture. You can upload a photo from your computer, or take a photo straight from your webcam. If you want to take a photo with your webcam, you must first click “Allow” when your web browser asks permission to activate your webcam.

    nbi-clearance-online-allow-camera

    To set your photo, click on the “Change Photo” button on the top right part of the page. It’s up to you, you can choose “take picture” with your webcam right then and there, or upload photo from your computer if you have a nice photo of yourself saved in there. ๐Ÿ™‚

    When you’re in that page, it’s time to complete your personal details. All fields with an asterisk (*) are required.

    Now, enter your birth place and citizenship under “Application Information”.

    Under “Contact Details” section, you are required to enter your complete “Address” and “Mobile” number.

    And under “Family Background” section, you must enter your father’s name, his birth place, your mother’s name, and her birth place.

    Finally, under “Other Information” section, you need to enter your Educational Attainment (kung ano’ng natapos mo), occupation, religion, height in centimeters (Note: 1 foot = 30.48 cm, 1 inch = 2.54 cm), weight in kilograms (Note: 1 pound = 0.453592 kg), complexion, and identifying marks (e.g. mole or scar on cheek).

    When you have entered info on every required field, click the “Save Information” button.

    If you’re okay with all the information you entered, you may now apply for an NBI Clearance. Click “APPLY FOR CLEARANCE” button on the top right of the page.

    A box for your confirmation will pop up. Select NEW or RENEW under Application Type. If you already received an NBI Clearance before, choose RENEW. If this is your first time, choose NEW. For the Presented ID field, enter the name or ID number of the valid ID that you plan to present. This can be your passport number, driver’s license number, voter’s ID, postal ID, SSS, GSIS, PhilHealth, Senior Citizen number, etc. Click the button to submit.

    Done? Now we go to the billing process. The NBI site reminds us the following:

    Your REGISTRATION CODE or REFERENCE NUMBER will be provided after you select your PAYMENT OPTION.

    Your REFERENCE NUMBER shall be your GATE PASS when you enter NBI Clearance Centers.

    To avoid inconvenience and long lines, please pay your NBI CLEARANCE FEE using your REFERENCE NUMBER at the selected PAYMENT OPTION. If you wish to pay over-the-counter at NBI, please bring your unpaid REFERENCE NUMBER for auto-encoding.

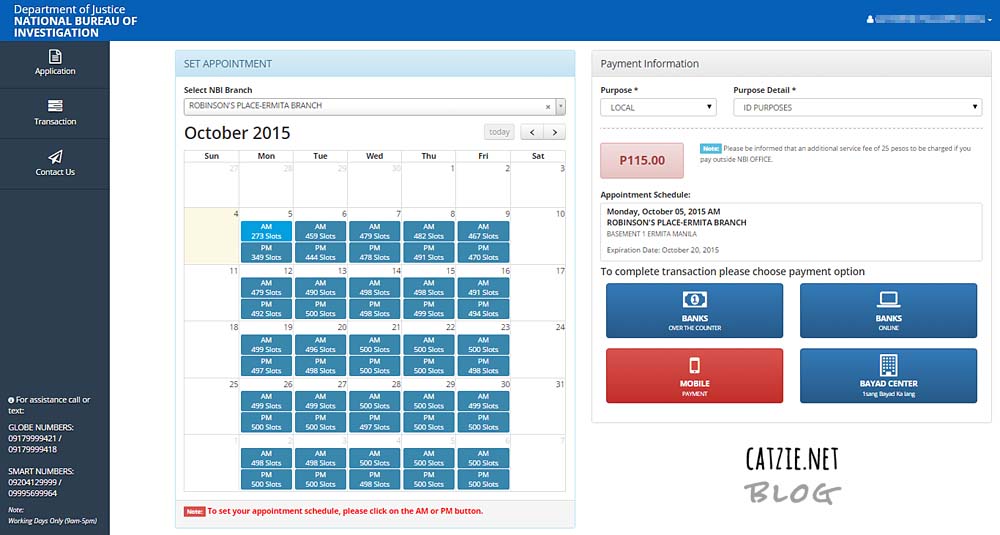
    We can pay for the NBI Clearance outside NBI Clearance centers, but we can also pay over-the-counter at NBI. Please be informed that an additional service fee of 25 pesos to be charged if you pay outside NBI OFFICE. Of course most people won’t choose to pay right there at NBI to avoid long lines. There are many options for payment, such as over-the-counter bank deposit, online bank deposit, Globe G-Cash (if system is up), or any Bayad Center.

    nbi-clearance-center-billing-online

    When you click on the payment method of your choice (in my case, “BANKS ONLINE”), NBI Clearance website reminds us this:

    A REMINDER

    Once you click PROCEED TO PAYMENT here are the next steps:

    1. A payment page will open. Select preferred ONLINE BANKING OPTION then follow instruction.
    2. You will be provided a REFERENCE NUMBER.
    3. Pay your fee to the selected Payment Channel using your REFERENCE NUMBER.
    4. Go to TRANSACTION PAGE and print Application Form.
    5. Bring Application Form to NBI Center for photo image and fingerprint capture.

    It’s time to click “Proceed to Payment” button.

    I don’t know which payment center is most convenient to you, but I’ll give you an example on how you can pay via BPI Express Online.

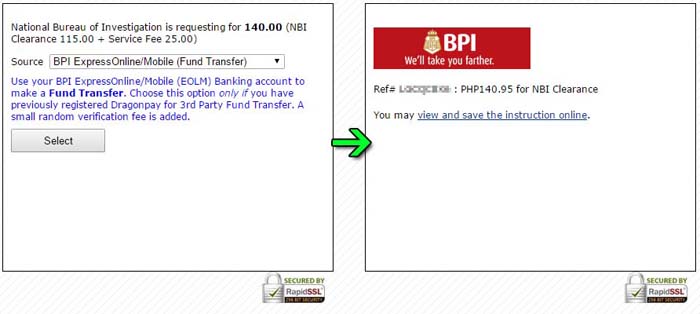
    The following screenshots shows you the payment gateway they use. If you want to use a BPI Express Online account, your transaction may look like this:

    nbi-clearance-online-payment-bank

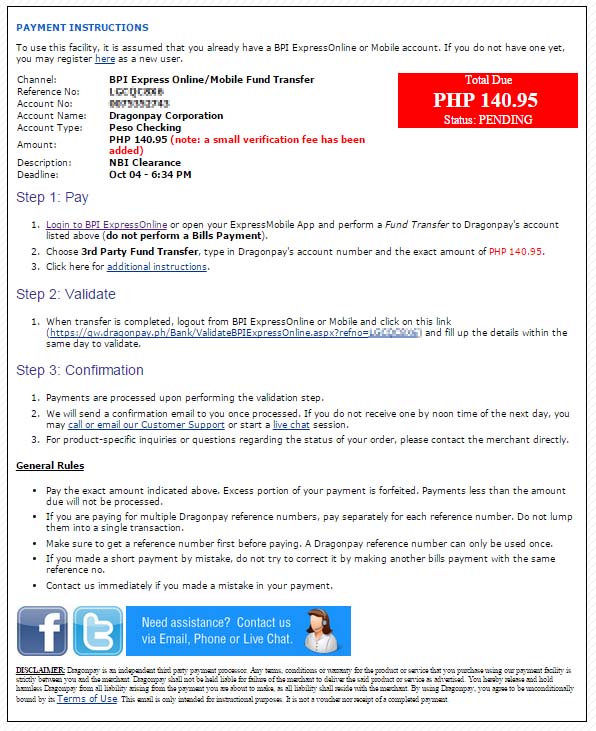
    Following screenshot shows Payment Instructions for BPI ExpressOnline or Mobile account:

    nbi-clearance-pay-via-bpi-express-online

    You will use the reference number that NBI’s system gave you as you do Fund Transfer via BPI Express Online.

    A message from the NBI Clearance site after payment process:

    Thank you for using NBI ONLINE APPLICATION SYSTEM!

    To see the status of your REFERENCE NUMBER and application please go to TRANSACTION PAGE.

    If you need more assistance please feel free to contact or text:

    GLOBE NUMBERS:
    09179999421 / 09179999418

    SMART NUMBERS:
    09204129999 / 09995699964

    Or send an email using CONTACT US PAGE.

    Now, make sure you have paid for your NBI Clearance through the method of your choice. Track your transaction status by visiting the Transaction page.

    And of course, don’t forget about your NBI Clearance REFERENCE NUMBER and 2 Valid IDs on your appointment date!

    So, how was it? ๐Ÿ™‚ Feel free to share with us your experiences when you have tried to apply for NBI Clearance with the help of the Internet. ๐Ÿ™‚


    NBI Clearance Application in June 2013 Ever Gotesco Mall Recto

    Let me share with you my experience in getting an NBI Clearance this year 2013.

    I paid via GCash and entered my details online at NBI-Online.comย before booking a schedule and going to the NBI Clearance Center at Ever Gotesco Mall, Recto.

    (more…)